The SimScale Agent
Setting up a simulation traditionally means working step by step through the simulation tree: selecting an analysis type, assigning materials, defining boundary conditions, and configuring a mesh. The SimScale Agent offers an alternative, conversational way to do this. Instead of navigating every tree item manually, you can describe what you want in plain language, and the agent configures the corresponding settings for you.
Accessing the Agent
The SimScale Agent is available from within any simulation analysis in the Workbench. Open it by clicking the AI Agent button, or the chat icon in the corner of the 3D viewer. The agent opens as a panel alongside the simulation tree and the 3D viewer, so you can keep an eye on the model while you work with it.
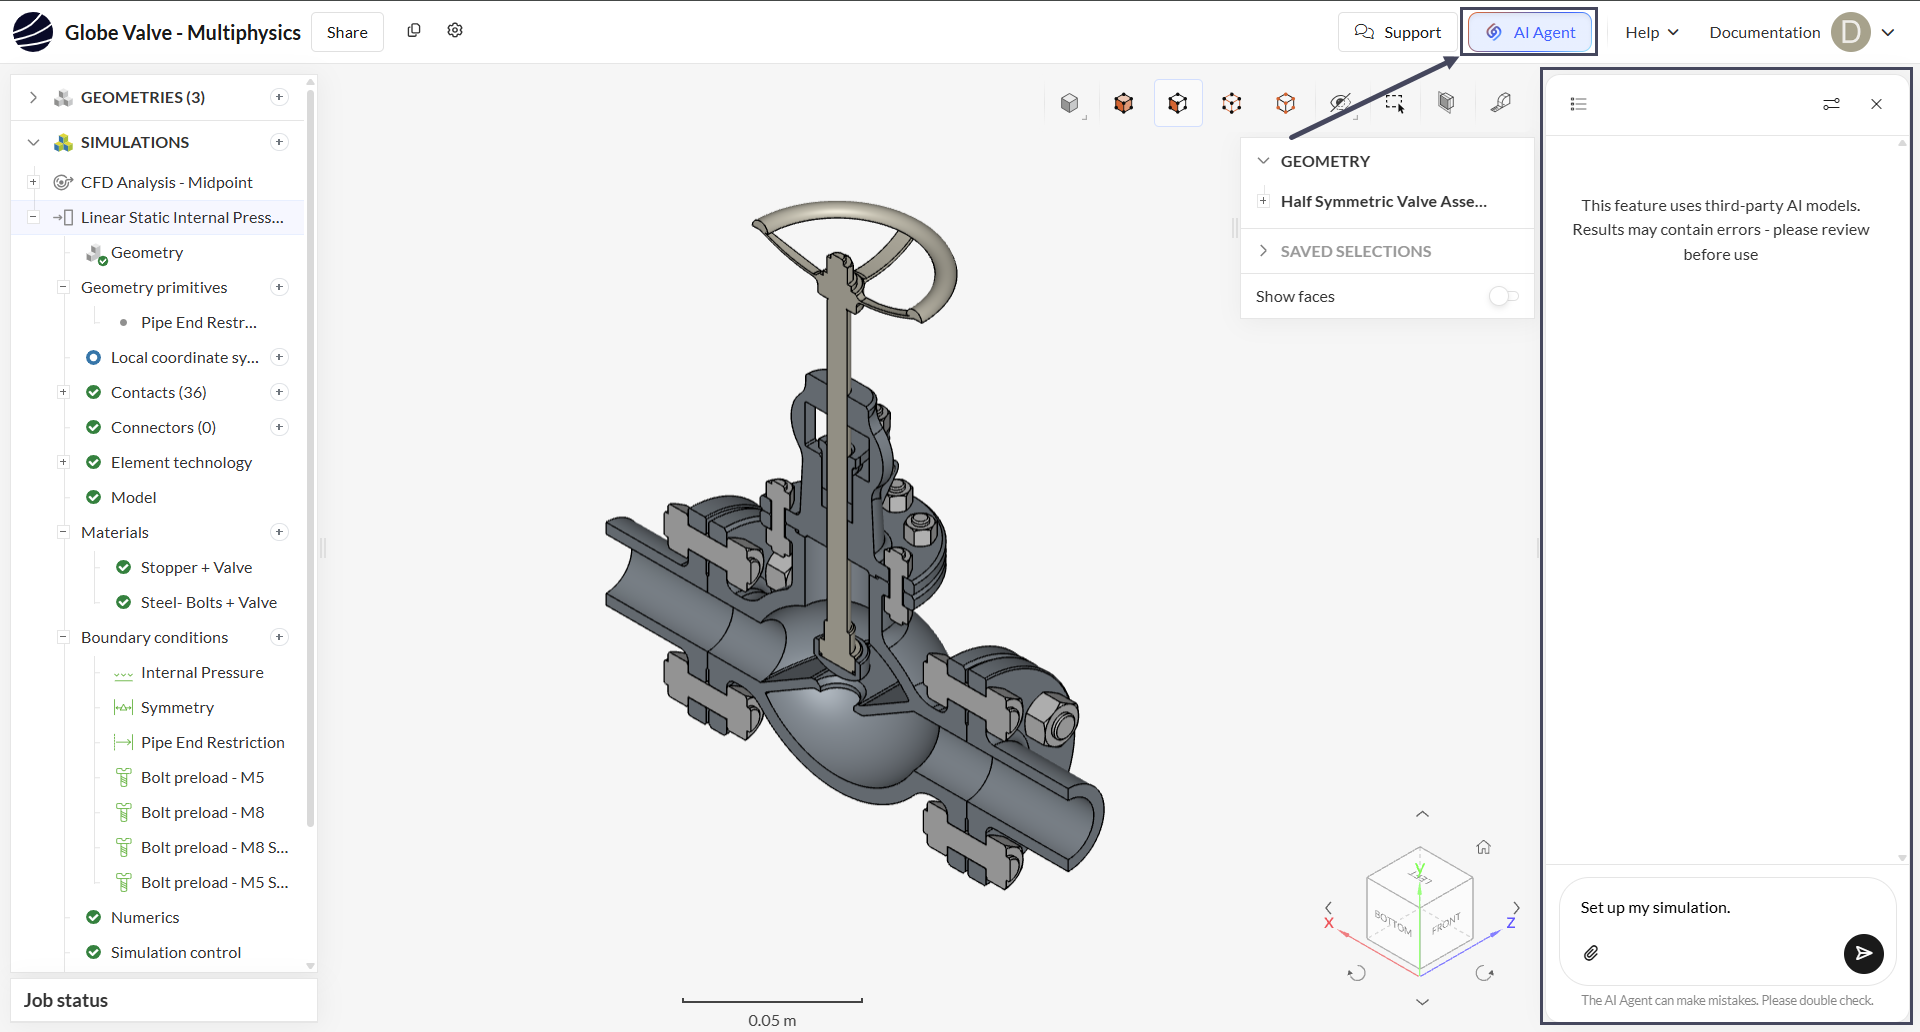
You interact with the agent the same way you would with a chat assistant: type an instruction into the message field at the bottom of the panel and send it. The agent reads your current simulation tree, applies the requested changes, and reports back what it configured. You can also attach a file, such as a specification document, using the attachment icon next to the message field.
Note
The SimScale Agent can make mistakes. Review the settings it applies before running your simulation, the same way you would review a manually configured tree.
Agent Panel Components
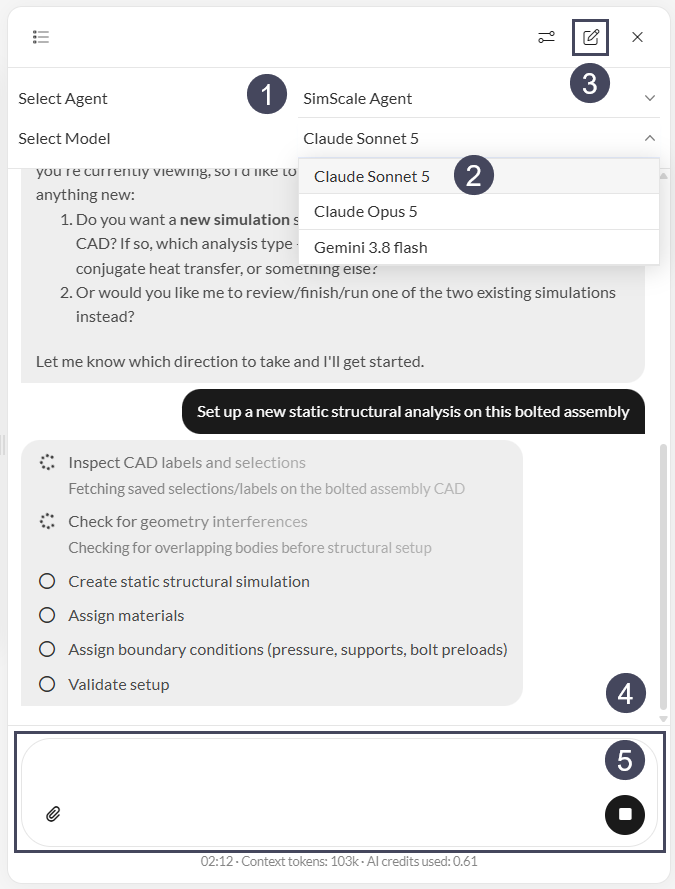
At the top of the panel, two dropdowns let you control how the agent behaves. Three more elements round out the panel’s core functionality:
- Select Agent: chooses between the SimScale Agent, which is pre-configured for general simulation setup tasks, and a Custom Agent. Custom agents are covered in a dedicated knowledge base article.
- Select Model: chooses the underlying large language model (LLM) that powers the conversation. A comparison of the available models for simulation tasks is covered in a dedicated knowledge base article.
- Start a new chat: begins a fresh conversation with the agent, clearing the current thread.
- Chat thread: shows the conversation history with the agent, including its responses and any tasks it’s working through.
- Message field: where you type your instructions to the agent.
Starting a Conversation
To get started, open the agent panel and type a request into the message field. The agent works best with clear, specific instructions. Where you can, refer to parts by their role rather than by name — “all solid parts”, “the fluid region”, “every inlet” — since a name like “the housing” only resolves if a body in your model is actually labelled that way. A few example prompts to try separated by different categories:
Works in any project
- “Summarize the current boundary conditions.”
- “Check my setup for problems before I run it.”
Building a setup
- “Inspect my geometry and ask me whatever you need to know about my objectives, then build a complete simulation setup and validate it — but don’t run it yet.”
Meshing
- “Create three meshes at coarse, medium and fine settings for a mesh independence study, but don’t run them yet.”
Running a simulation
- “Set up, mesh and run a simulation on my geometry, then summarize the results.”
After a run has finished
- “Find the extreme values in my latest results and show me where they occur.”
Reusing what worked
- “Turn the setup we just built into a reusable set of instructions for similar geometries.”
The agent drafts the instructions in the chat. To apply them automatically in future projects, paste them into the instructions field of a custom agent in your dashboard, or upload them to its knowledge base. The agent cannot save them for you from the chat.
Writing effective prompts is covered in more depth in a dedicated knowledge base article on prompt engineering for the SimScale Agent.
Typical Use Cases
The SimScale Agent supports a range of engineering workflows. Each of the following is covered in more detail in its own knowledge base article:
- RFQ Automation: generate a rapid feasibility assessment directly from a customer specification document.
- Code Compliance: automatically verify a simulation setup against engineering standards, such as AEC or ASME.
- NPD Acceleration: iterate over multiple design concepts in parallel early in the development process.
Scope and Limitations
The SimScale Agent assists with setting up a simulation but does not replace engineering judgment. Always inspect the simulation tree after the agent applies changes, and validate results the same way you would for a manually configured simulation.
The choice between the SimScale Agent and a Custom Agent, the available LLMs, and prompt engineering techniques are each covered in their own dedicated knowledge base articles rather than in depth here.
Last updated: September 15th, 2026
Did this article solve your issue?
How can we do better?
We appreciate and value your feedback.