Dashboard
Organizing your SimScale content is critical to allowing you and your colleagues to quickly and easily find the correct project while ensuring that only the correct people can access it. This can be done within your SimScale Dashboard. There are two core features of content organization at SimScale: Spaces and Folders.
These features allow you to organize your content as well as allow your organization to efficiently manage groups of users and the simulation content they produce and access.
Introduction
An organization is a group of users on the SimScale platform with common goals, typically colleagues at a company. You and the other users will have common goals but will typically work on different internal projects or within different business units or groups. It is therefore important to be able to segregate the simulation content you produce so it is easier to find and possible to restrict access when needed. This can be referred to as space (section or area).
Dashboard
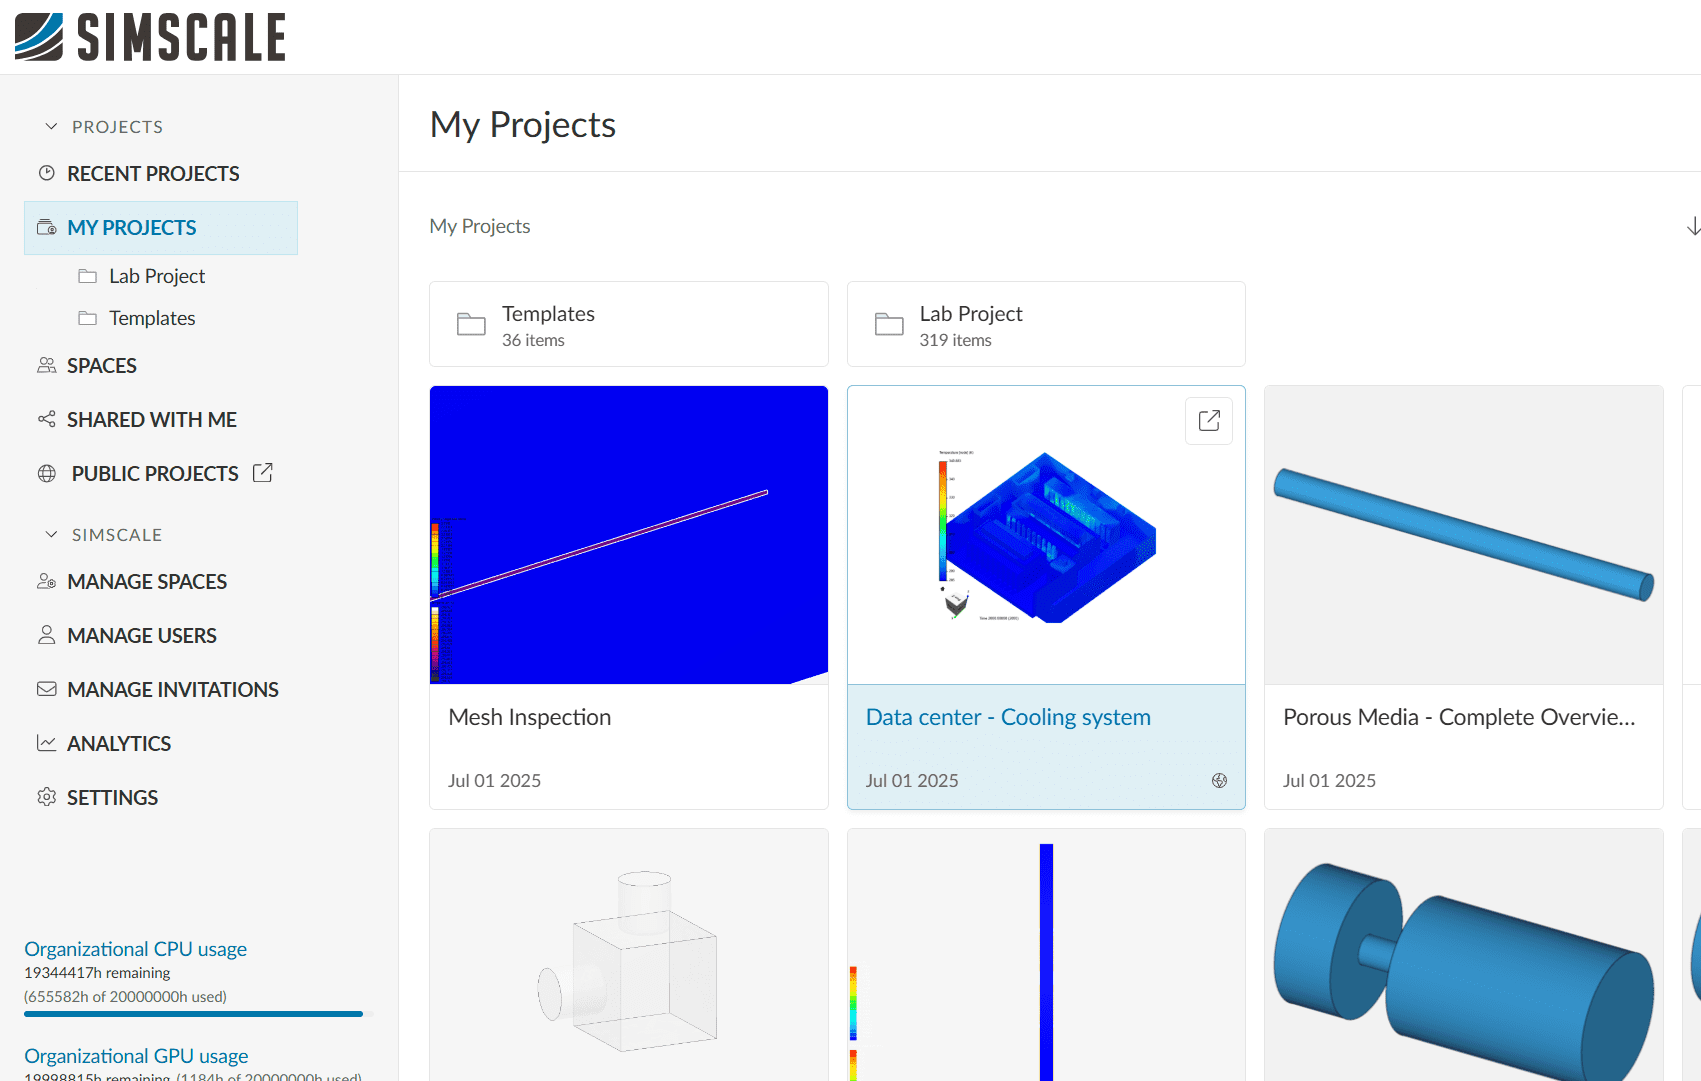
The Dashboard is one of the main environments in the SimScale platform. Users can create new projects, verify their core hour balance, and access projects that have been shared with them from their dashboard.
Find below an overview of the functions available:
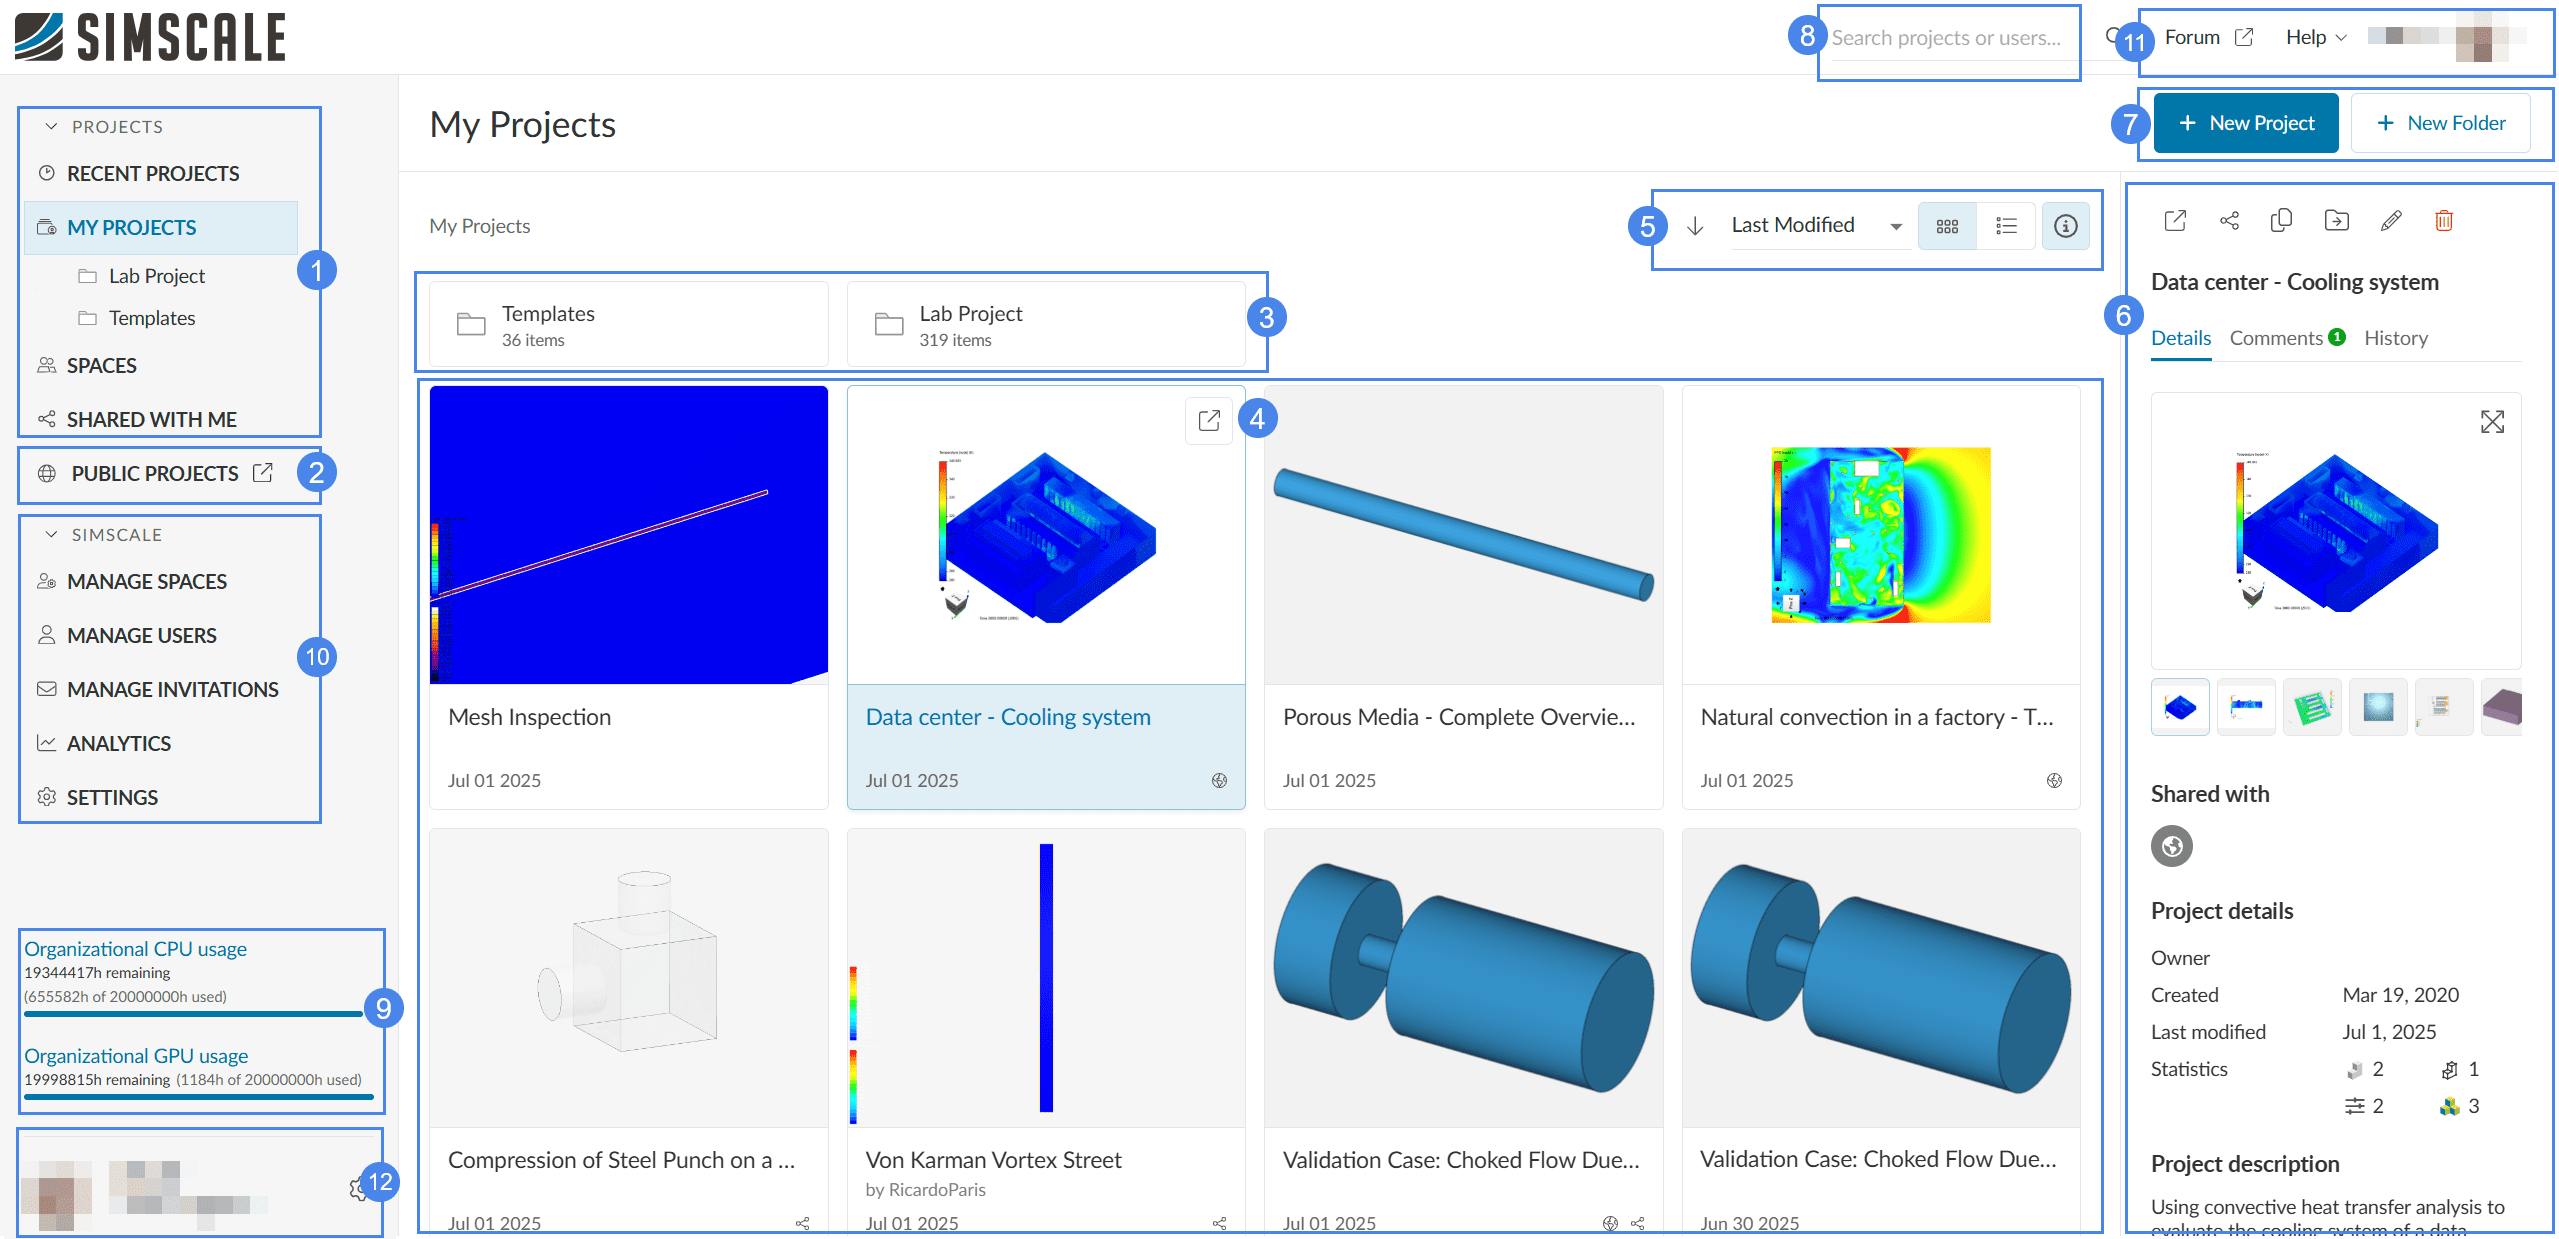
- Both My Projects and Recent Projects list the projects owned by the user, Spaces that the user is a part of, and the projects shared with the user.
- A link to all the public projects created by any user.
- Within a space, the user can open and edit Folders.
- Existing projects are shown in the center of the page.
- Different view modes and sorting options for projects.
- Information panel for selected projects and folders.
- The New Project button, on the top-right corner, is used to create new projects from scratch. From here you can also create new Folders.
- Search bar, allowing you to search projects with keywords of interest.
- Panel containing a summary of your core hour balance.
- Admin permissions, to create and manage spaces, access analytics, organization settings, manage users and invitations. This is available only to the organizational admins.
- Access to tutorials, documentation, forum, managing user account.
- Manage user details, simulation job usage overview, and API keys
Create New Simulation Project
To create a new simulation project, click the ‘New Project’ button on the Dashboard. The following dialog box appears:
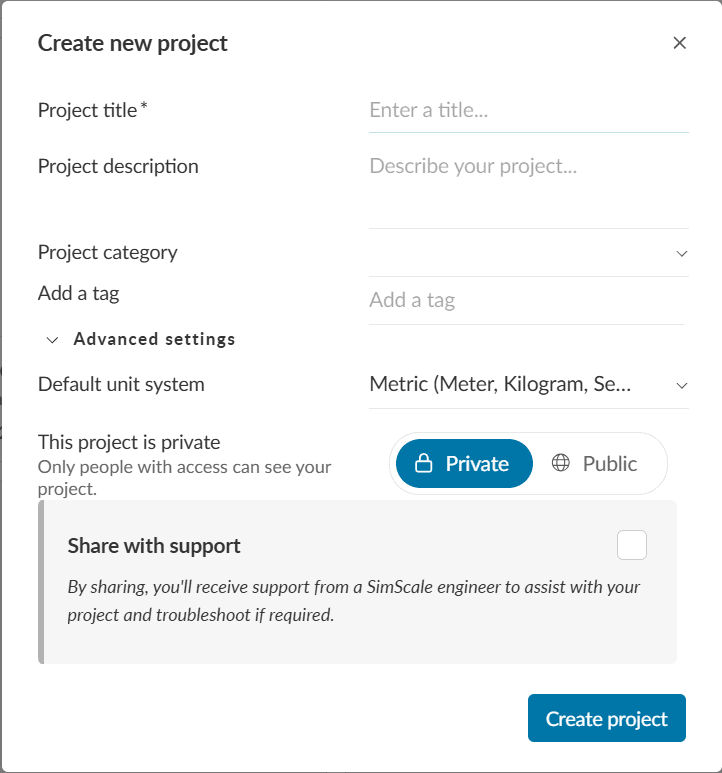
- Project Title: The project title should contain the name of the type of application you want to analyze as well as the simulation method you want to use, e.g. ‘Heat exchanger – CHT simulation’. This will help other users to understand what you’re trying to simulate.
- Project Description: Use the project description box to describe the purpose of your project in more detail. A good project description will make your project rank higher in the SimScale Public Projects Library.
- Project Category: The category selection allows you to categorize your project based on industry. Choosing a category will help your project rank higher in the SimScale Public Projects Library.
- Tags: Similar to the category selection, adding tags will help your project rank higher in the SimScale Public Projects Library. Tags are not pre-defined and can be chosen freely. A maximum of 12 tags can be added with each containing 3 – 50 characters.
- Advanced Settings: In the advanced settings you can choose whether to use SI or Imperial units to interact with the CAD model that you choose to upload into your project. You can also allow API access here.
- Public/Private Toggle: This toggle determines whether your project will be publicly available to everybody or only visible to you. A public project can be seen, copied, and downloaded by any SimScale user. In order to create private projects, you require a Professional SimScale account. See Plans & Pricing to upgrade or start your Professional trial.
Once the project is created, you’ll automatically be redirected to the SimScale simulation platform i.e. the Workbench.
Public vs Private Projects for Paid Users
By default, professional users cannot create public projects. If you wish to make some of your projects public to the community, an organization admin can allow that within the Settings tab of the Dashboard.
Note that if a professional user created public projects before upgrading their account to professional, those projects will remain public until the user sets them to private.
Managing Projects
The dashboard contains functionalities that allow you to create, open, copy, move, share, edit, and delete projects. By right-clicking on a project of interest, all options are shown:

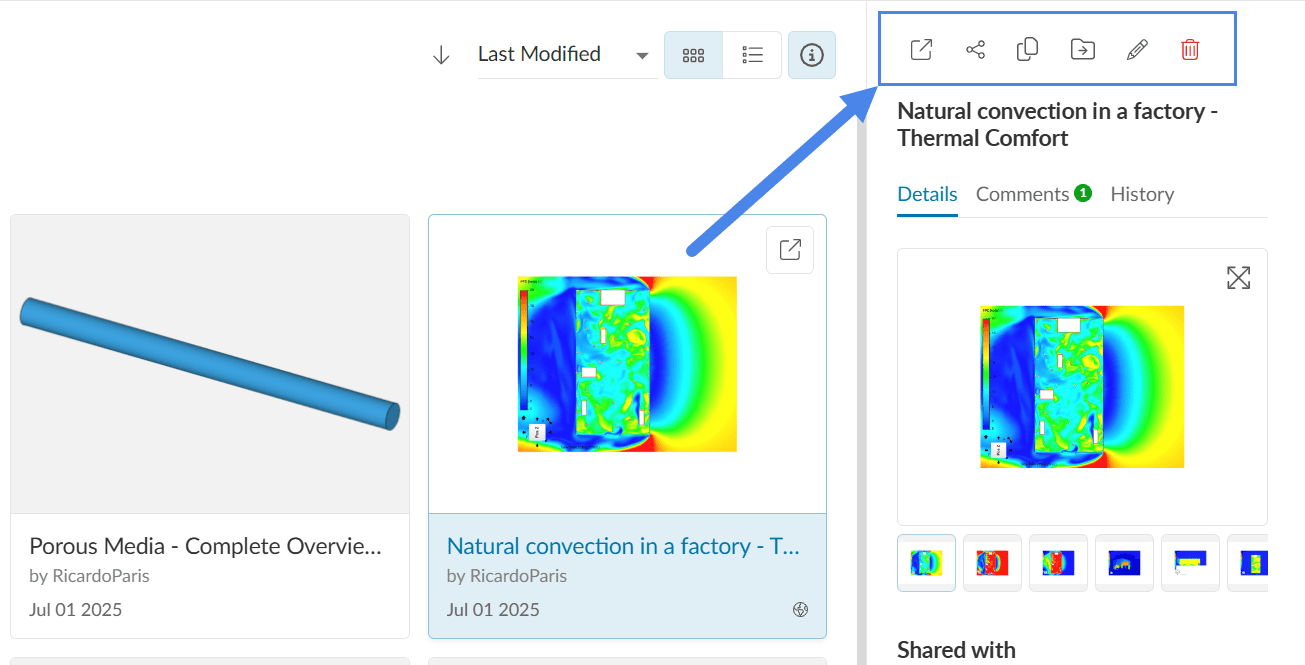
Once a project is selected, all editing options are also available on the right-hand side panel:
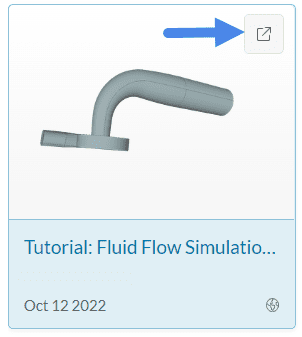
Furthermore, you can also open projects with a double left-click, or by selecting the project and clicking on the top-right icon:
Sharing Projects
Using the methods shown in figures 3 and 4, a specific project can be shared and the panel looks as follows:
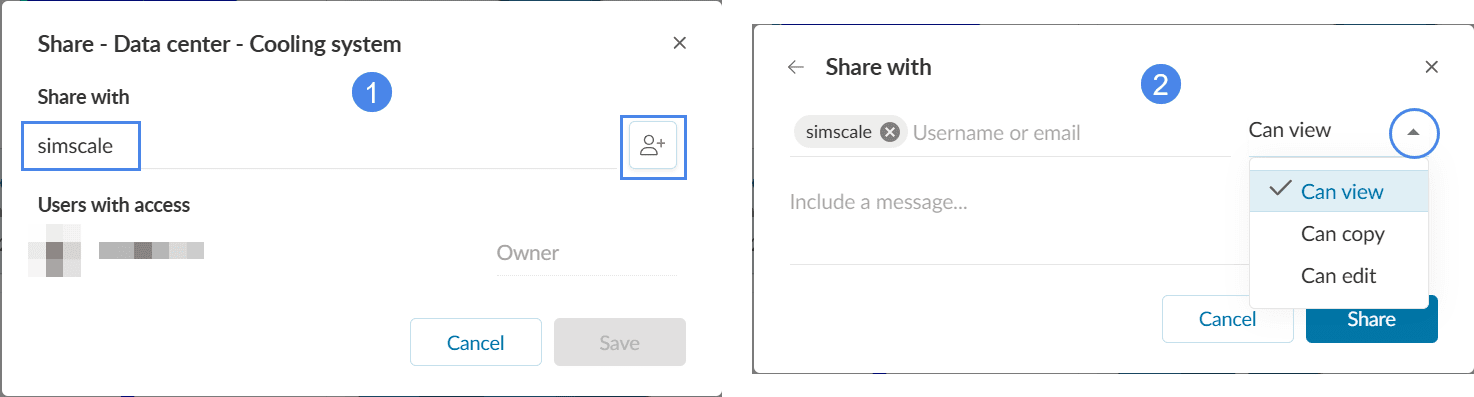
In Figure 6, the left-hand side image shows how to enter the username(s) you wish to share the project with. Then, head to the next step using the ![]() icon. Now add a sharing type that defines what the user can do with that shared project. Can view, Can copy, and Can edit are the three sharing types available in SimScale. They define how multiple users can collaborate.
icon. Now add a sharing type that defines what the user can do with that shared project. Can view, Can copy, and Can edit are the three sharing types available in SimScale. They define how multiple users can collaborate.
Sharing the project can also be done from within the Workbench. This and the different sharing types (view, copy, edit) are explained in the documentation below:
Spaces and Folders
My Projects
Every user has access to personal space which they can create content in. It is represented as My Projects within the Dashboard. Only you can create content within your personal space as you are the only member it contains.
Permissions in ‘My Projects’
The following table shows what you are permitted to do as a user in your personal space:
| Permission under ‘My Projects’ | Owner |
| Can view content and folders | |
| Can copy content | |
| Can create content and folders | |
| Can move content | |
| Can edit content | |
| Can delete content | |
| Can share content |
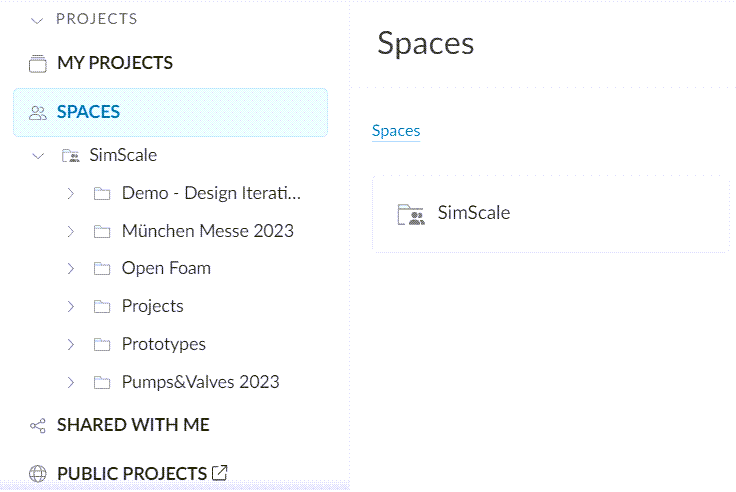
Spaces
Customers with Teams or Enterprise licenses have access to Spaces. Spaces is a section that can be seen by multiple users; its members are controlled by a company administrator.
Spaces can be used to allow only certain users to access specific content. For example, you might have a space for each customer project (Customer A – HX1B, Customer B – RM101) or for each group at your company (Product, Simulation). Any content created within or moved to a space can only be accessed by members of that space and any users it has been directly shared with.
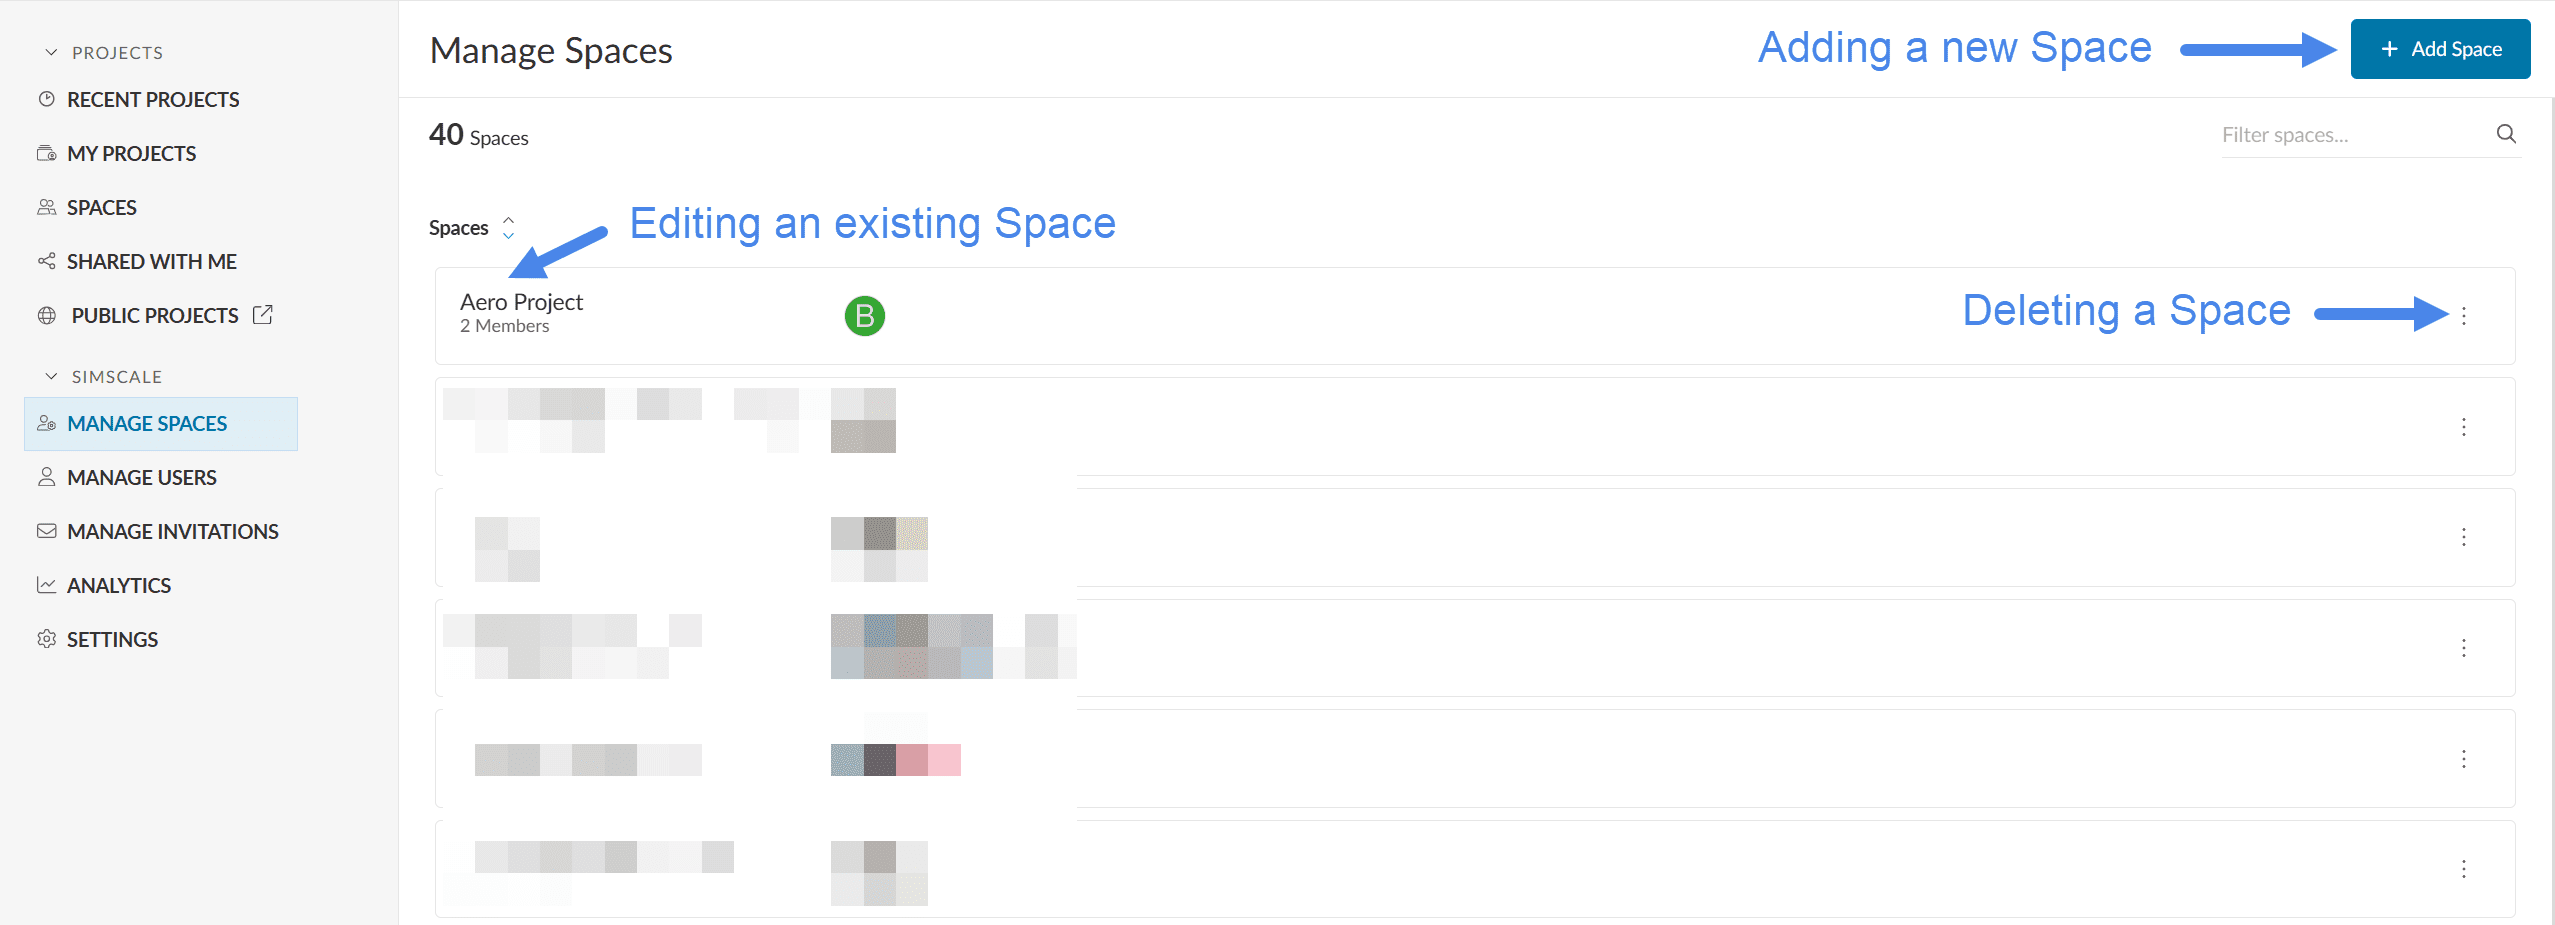
As an administrator, you can add and manage spaces. This is shown below:
Admin of an organization can set different sharing permissions which consist of No sharing, Within space, and Within organization.
Depending on the sharing permissions set by the admin individual projects can be shared with other users outside the space or your organization or made public. In this case, users will not gain access to see the folder or the space where the project is located.
It is also possible to share new and existing spaces across the entire organization by adjusting the Organizational access setting.
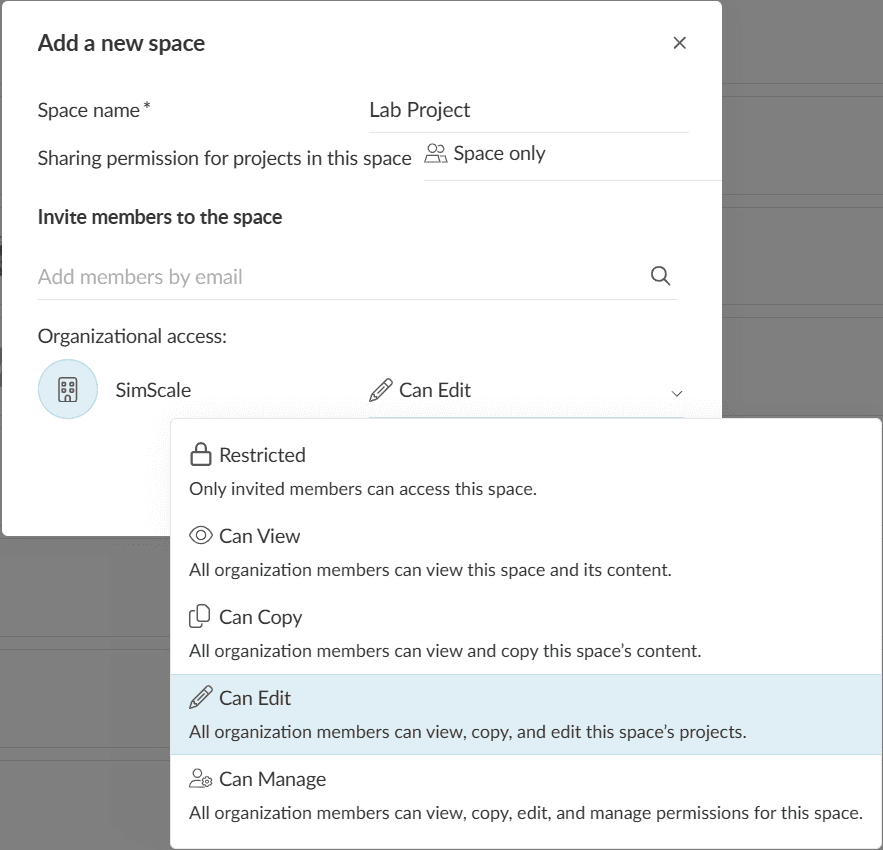
This option is especially useful for projects involving the entire organization, or when members are added and removed frequently from the organization.
Managing an Existing Space
To manage an already existing space select the space (see Figure 9). This will open a panel similar to Figure 11 allowing you to rename and also control the sharing permissions as well as manage the space members.
Adding a New Space
To add a space click on the ‘+ Add space’ button (see Figure 9). This will open a panel where you can name the space, control the sharing permissions, choose the members you want the space to include, and control organization access. Don’t forget to save the settings.
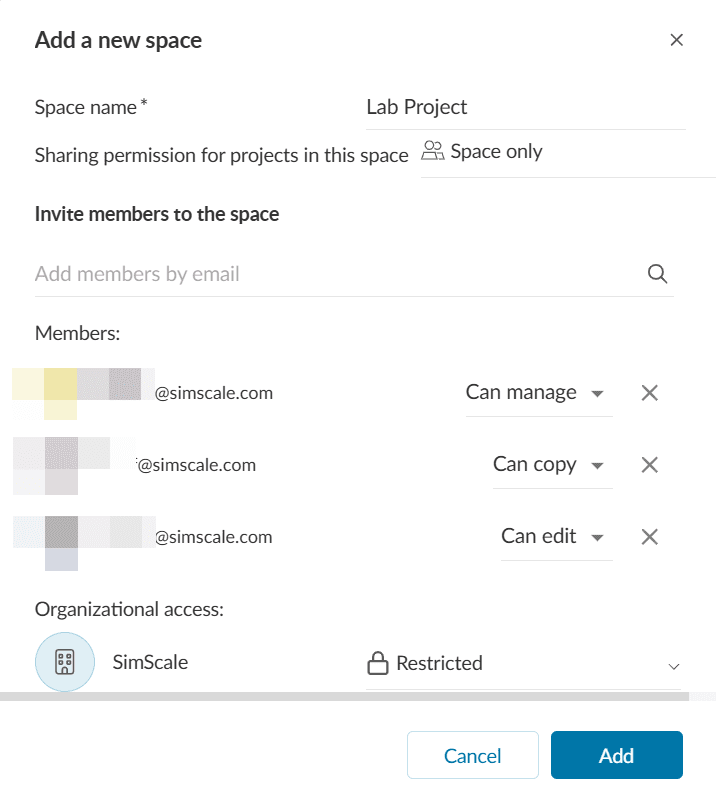
When creating a space, by default the access is Restricted to users that are added to the space.
Permissions in ‘Spaces’
Owners or members of a space get specific permissions for all projects contained in that space. In other words, the level of permissions granted is configurable. The following table shows what a space member is permitted to do if they have Admin, Edit, Copy, and View permissions:
| Permission of a space member | Admin | Edit | Copy | View |
| Can view content | ||||
| Can copy content | ||||
| Can create content and folders | ||||
| Can move content | ||||
| Can edit content | ||||
| Can delete content | ||||
| Can share content (if allowed by space setting) | ||||
| Can add/remove users to/from space |
Folders
A folder is a location to store your content, including projects and other folders. Folders in SimScale are managed in your dashboard, as discussed in the Dashboard section within this document. Every folder has an editable name.
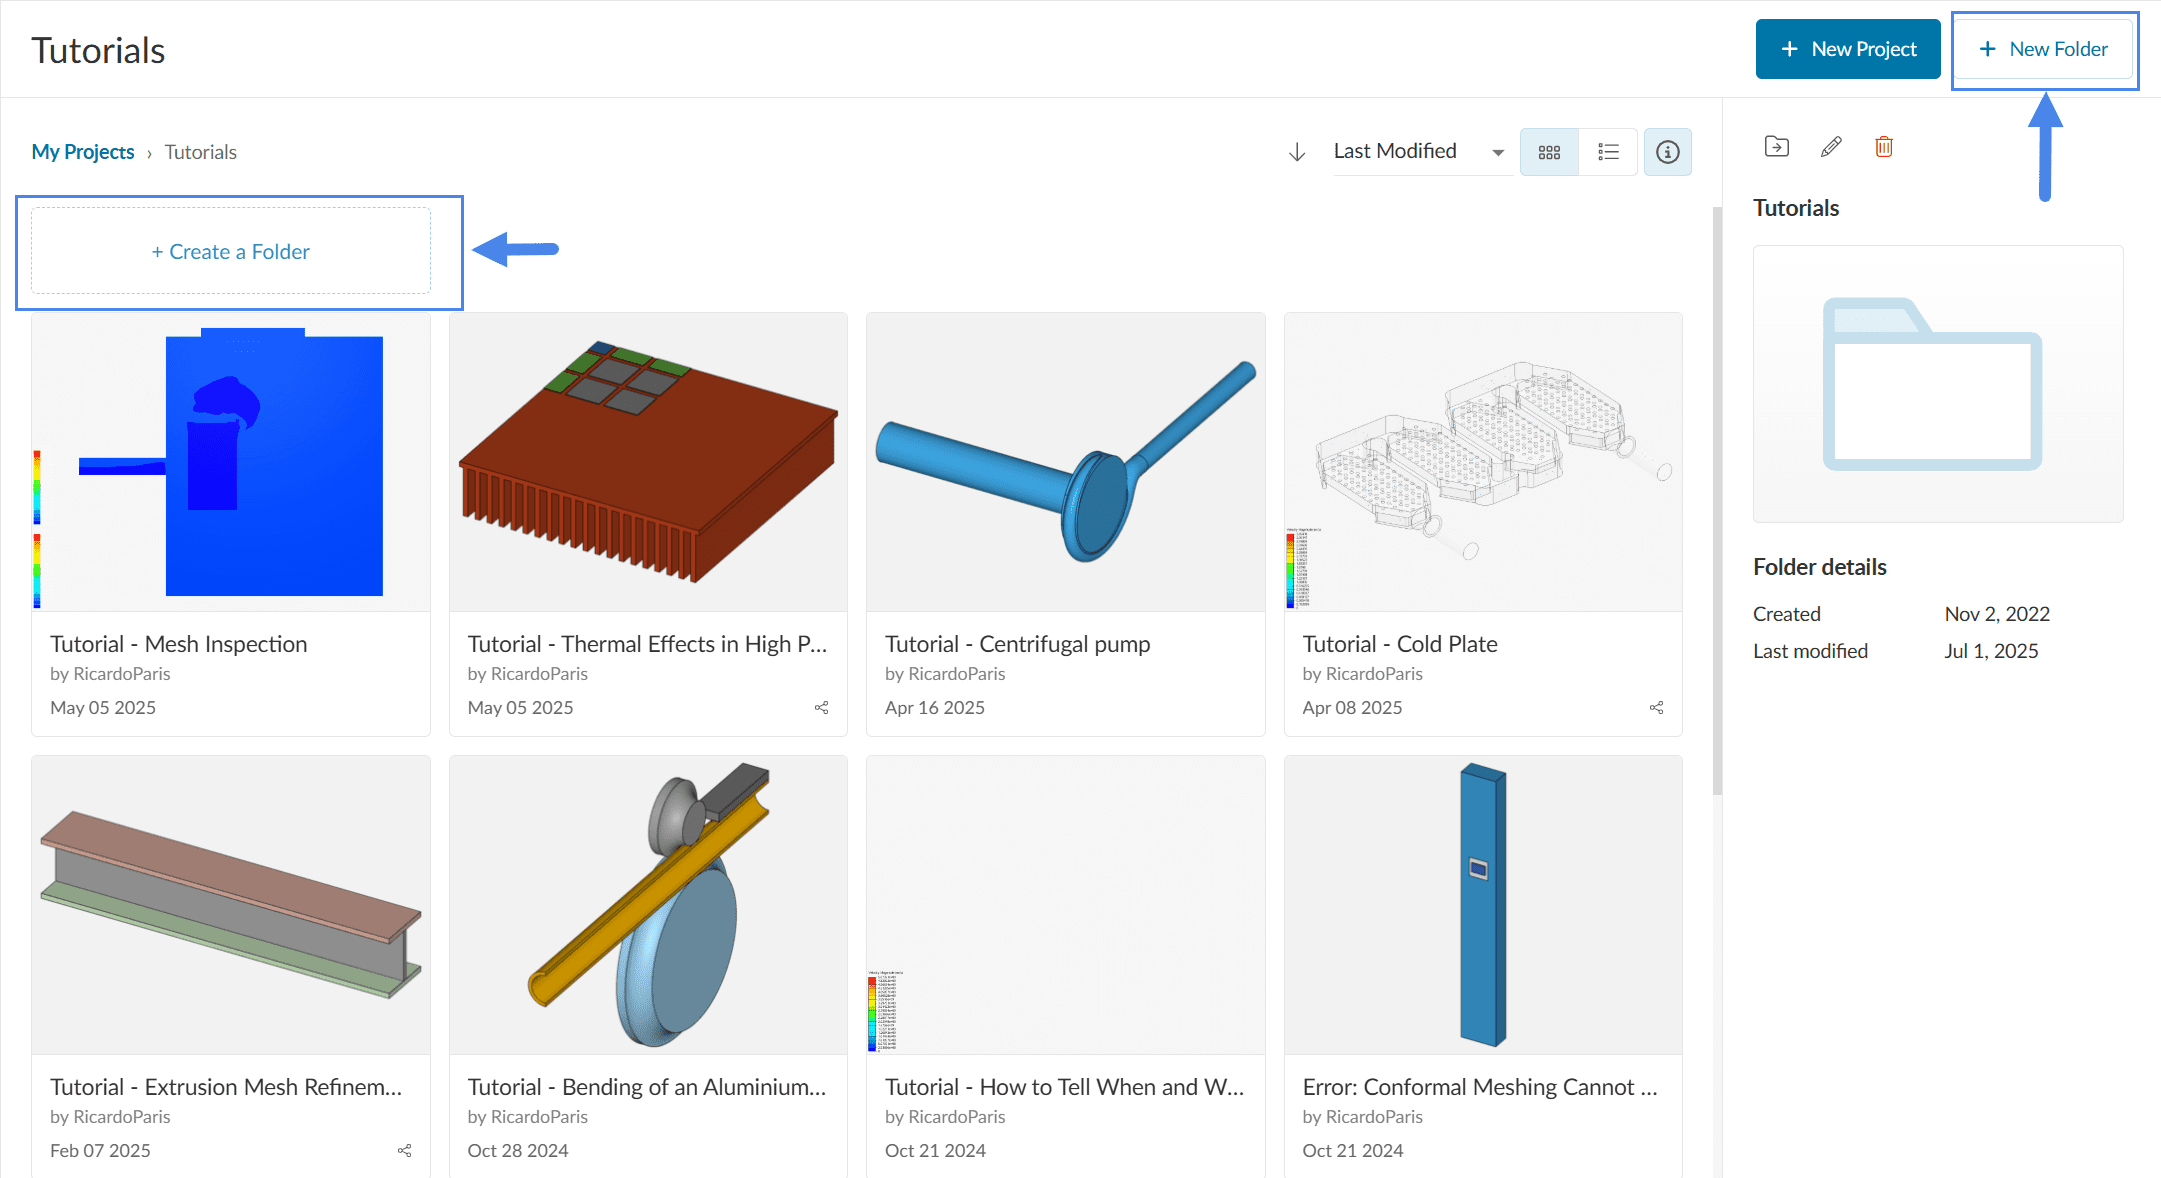
Creating Folders
To create a folder, navigate to a space that you have access to and select the icon in the upper right corner as shown. You will be prompted to provide a name for the folder.
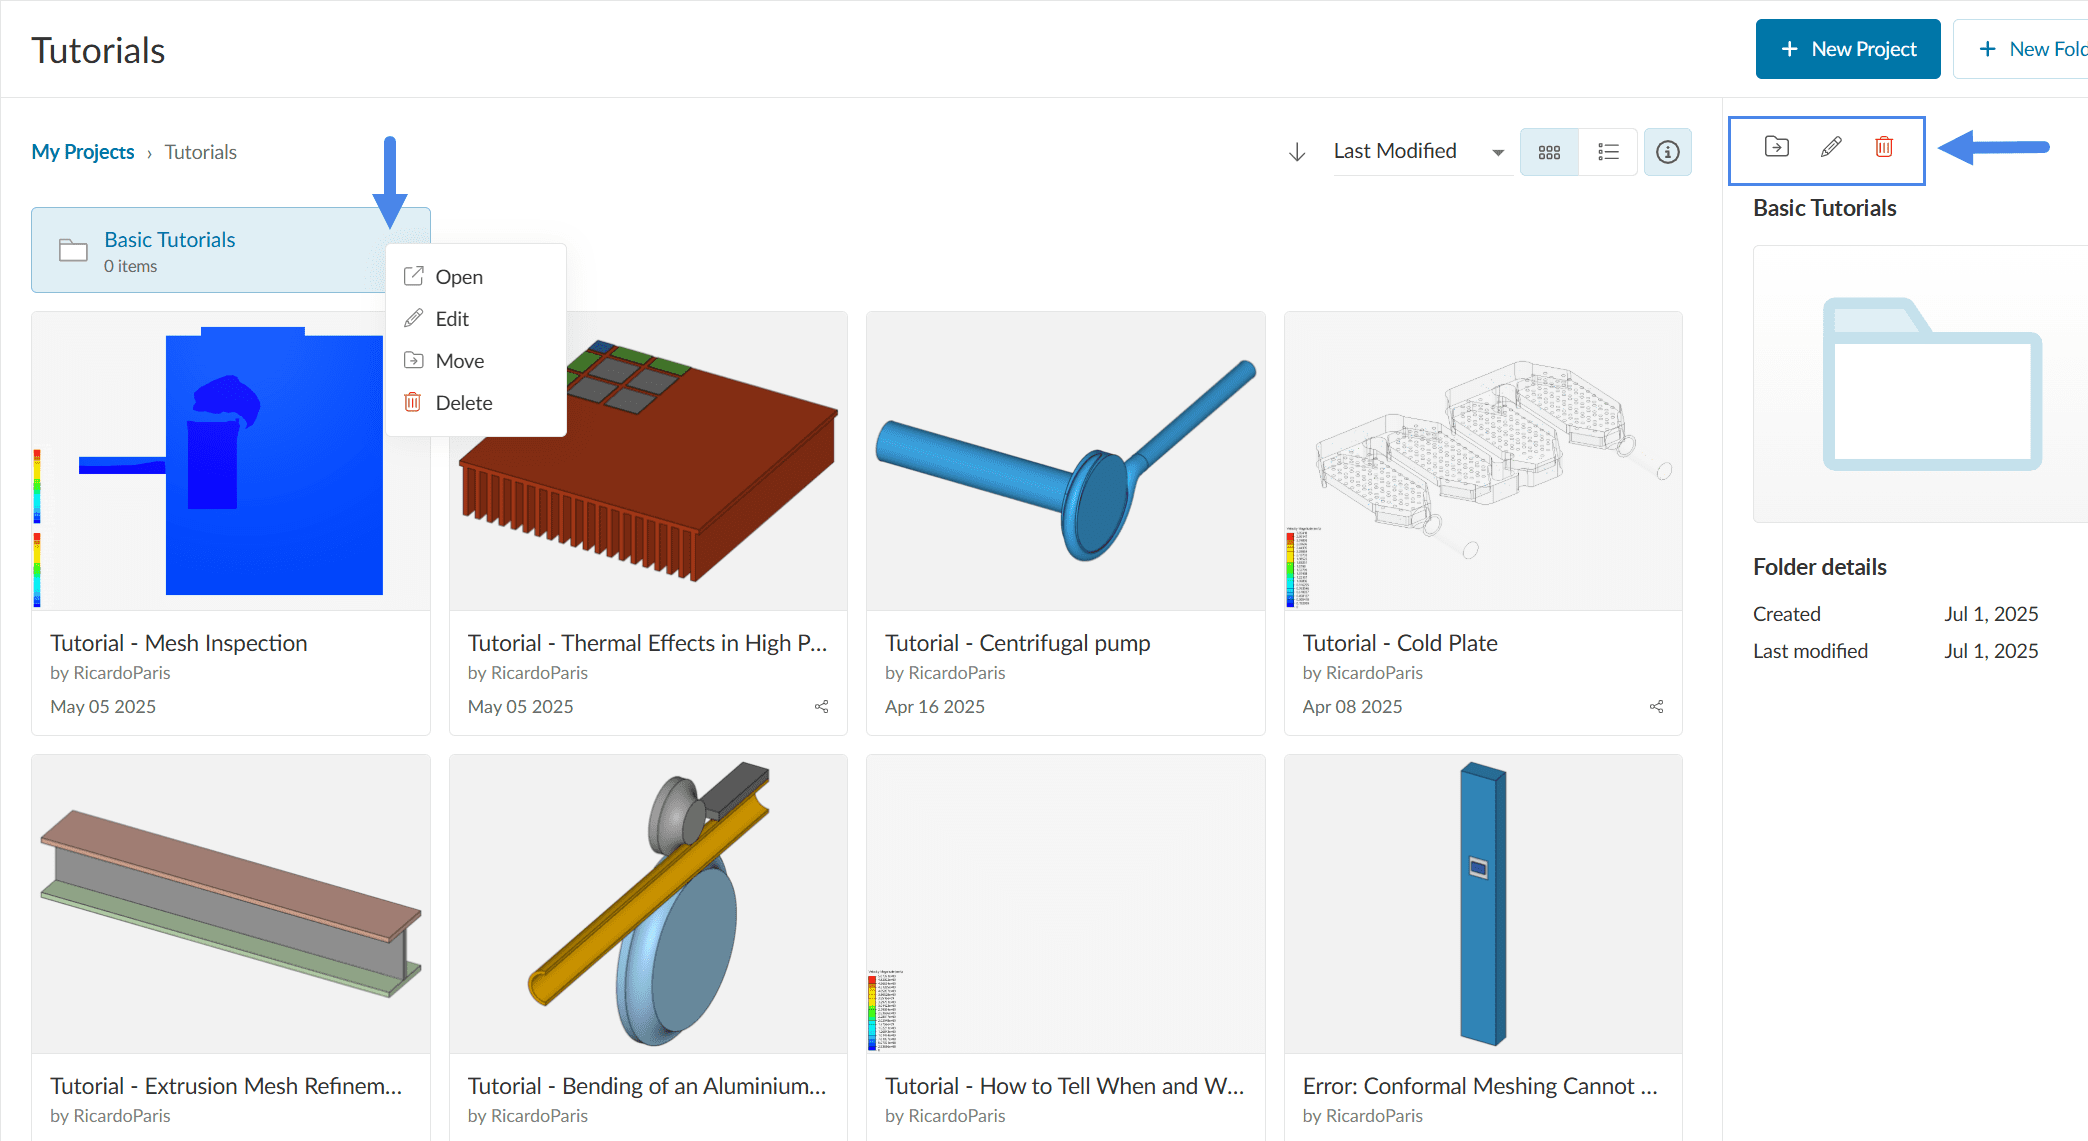
Folders can be opened, moved, edited, and deleted. To access these options, you can right-click on the folder, or use the right-hand side panel after the folder is selected:
Important
When a folder is deleted, all contained folders and projects within it will be deleted.
Organizational Account
Managing Users
Under Manage Users, admins of an organization can:
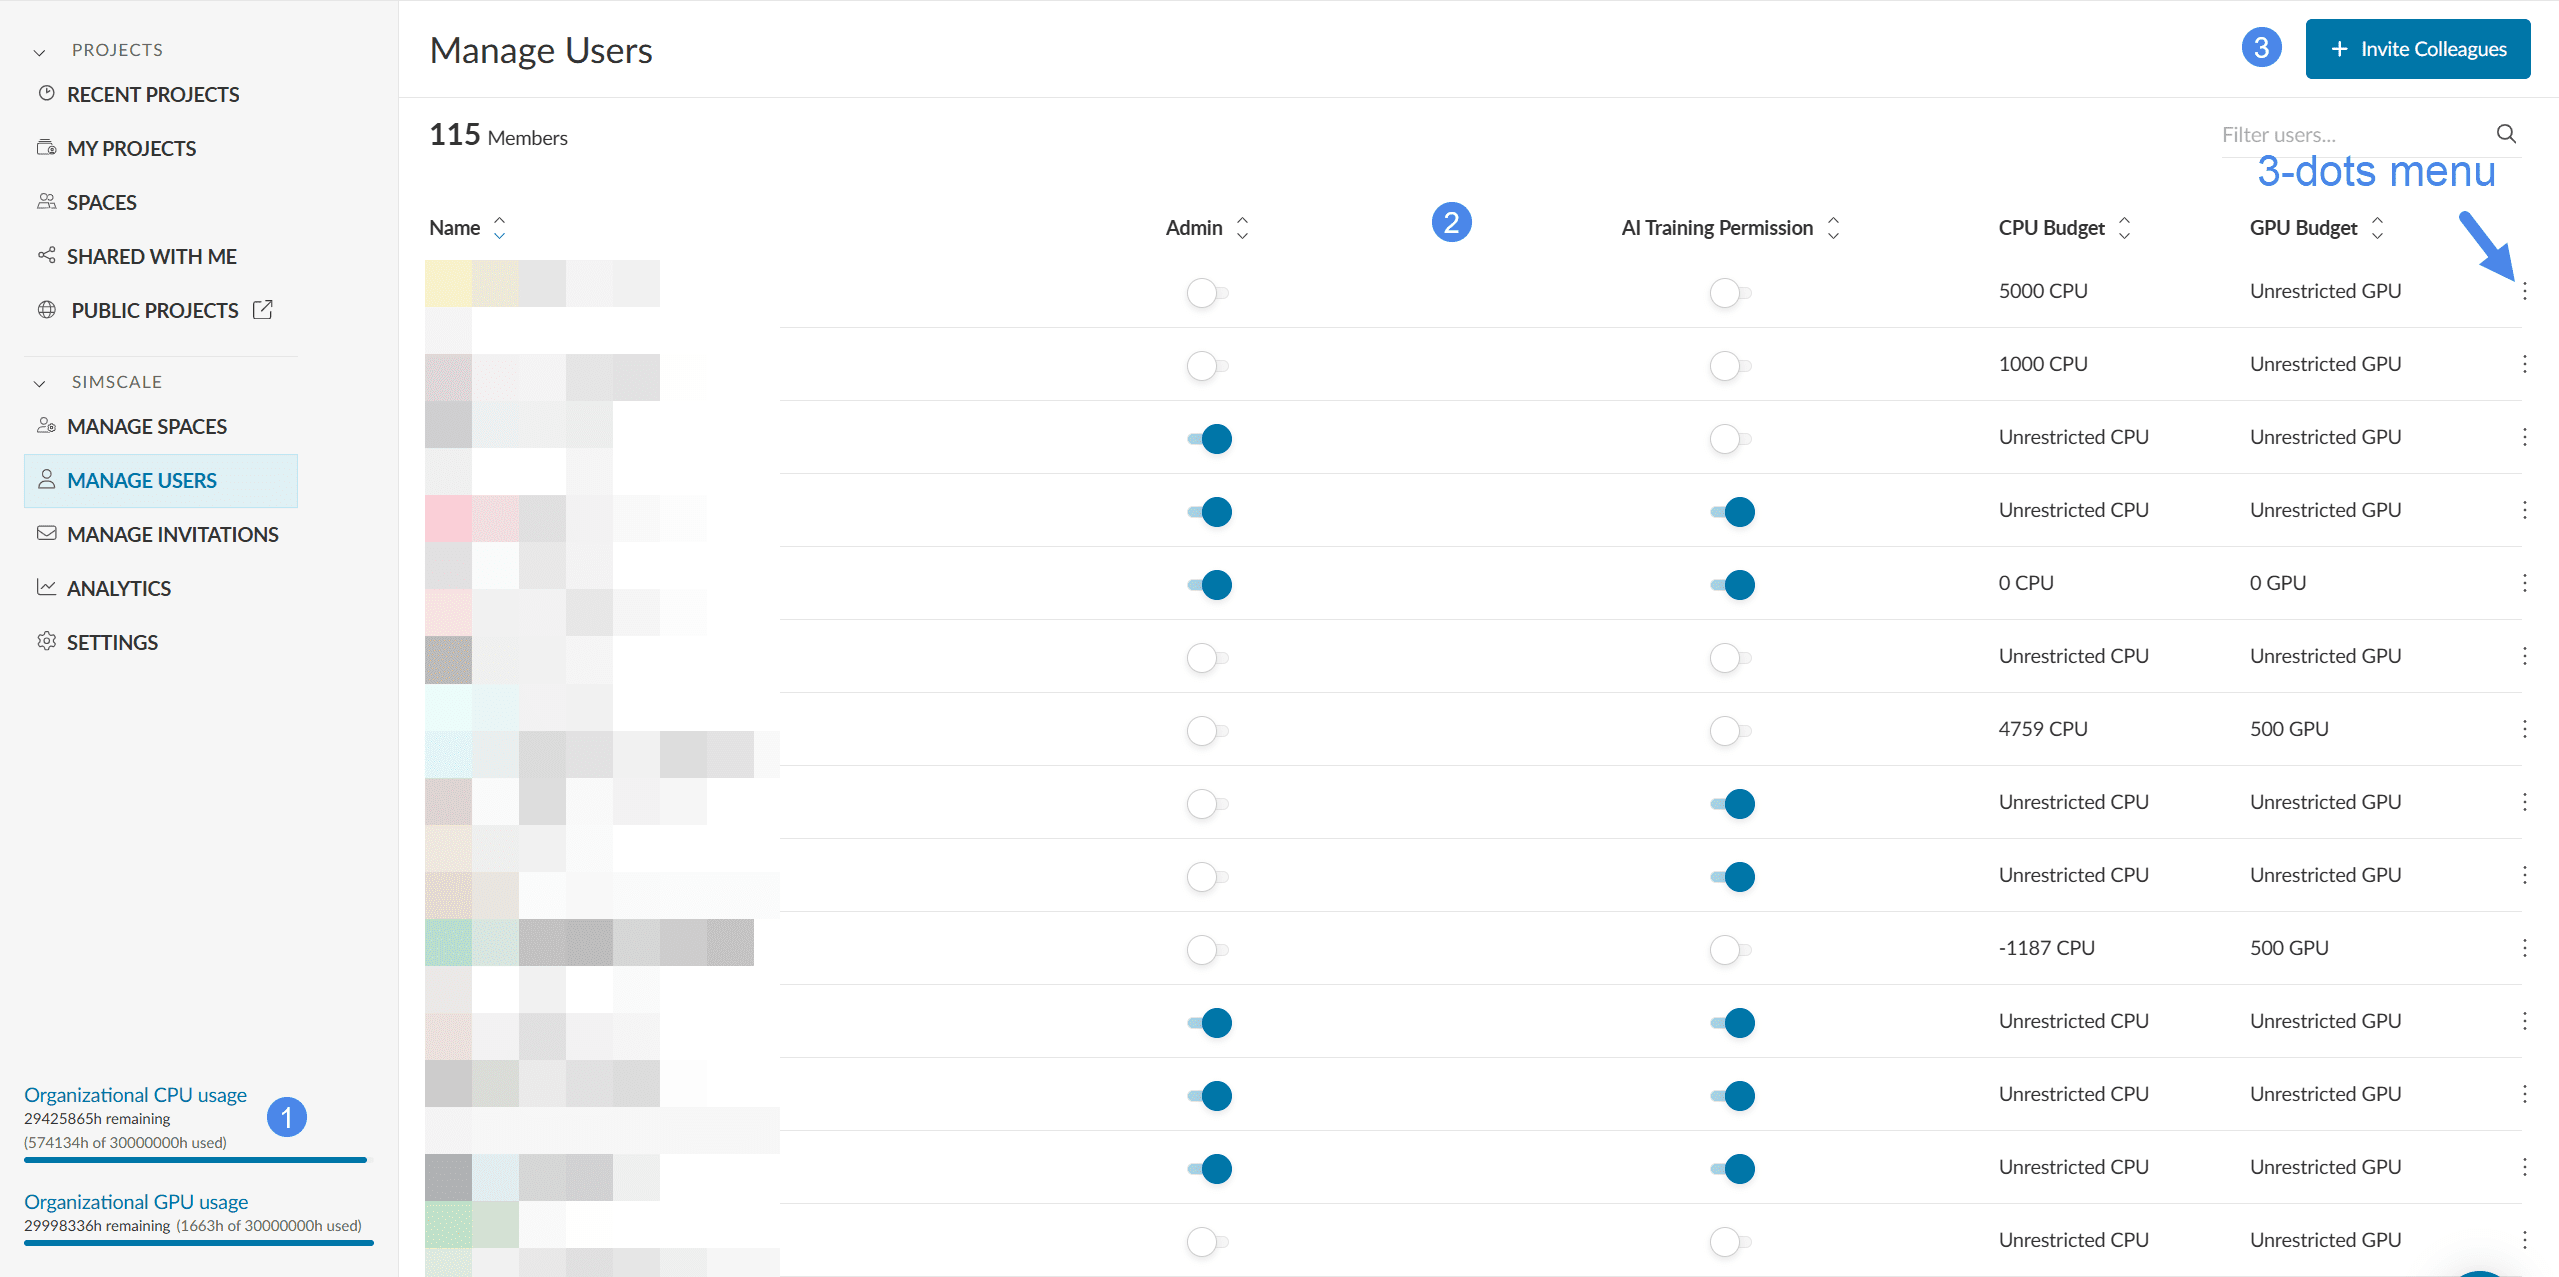
- See the organizational CPU hour and GPU hour availability
- Manage administrator rights, i.e. set other members as admins
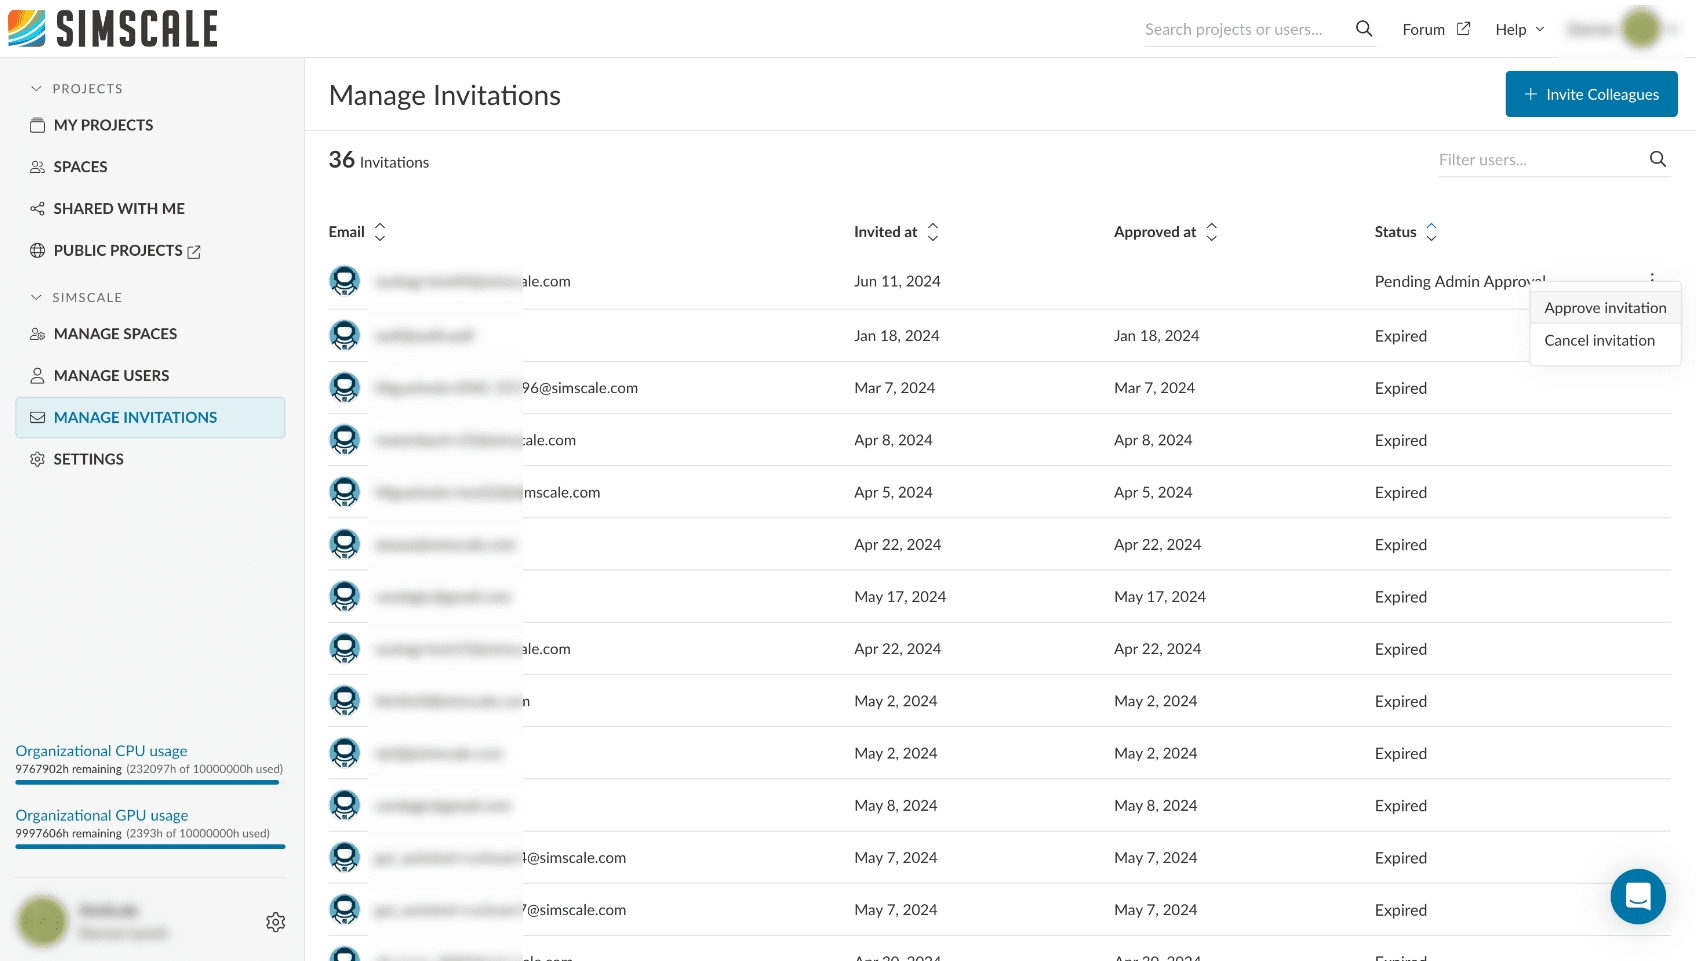
- Invite users/colleagues to the account
- The admin needs to confirm the invitations that are sent by the organization members.
- Admins also have the right to cancel the invitation after the email is sent to the invitee.
Admins have access to the 3-dot menu on the right which allows them to:
- Remove users
- Set CPU and GPU budgets/spending limits for specific users

Removing a User
If a user is removed from the organization the admin should select an inheritor user for all the projects that user owned. This includes projects in spaces and in personal space (My Projects).
Analytics
Within the Analytics tab, organization admins have an overview of the organization’s activities in SimScale:
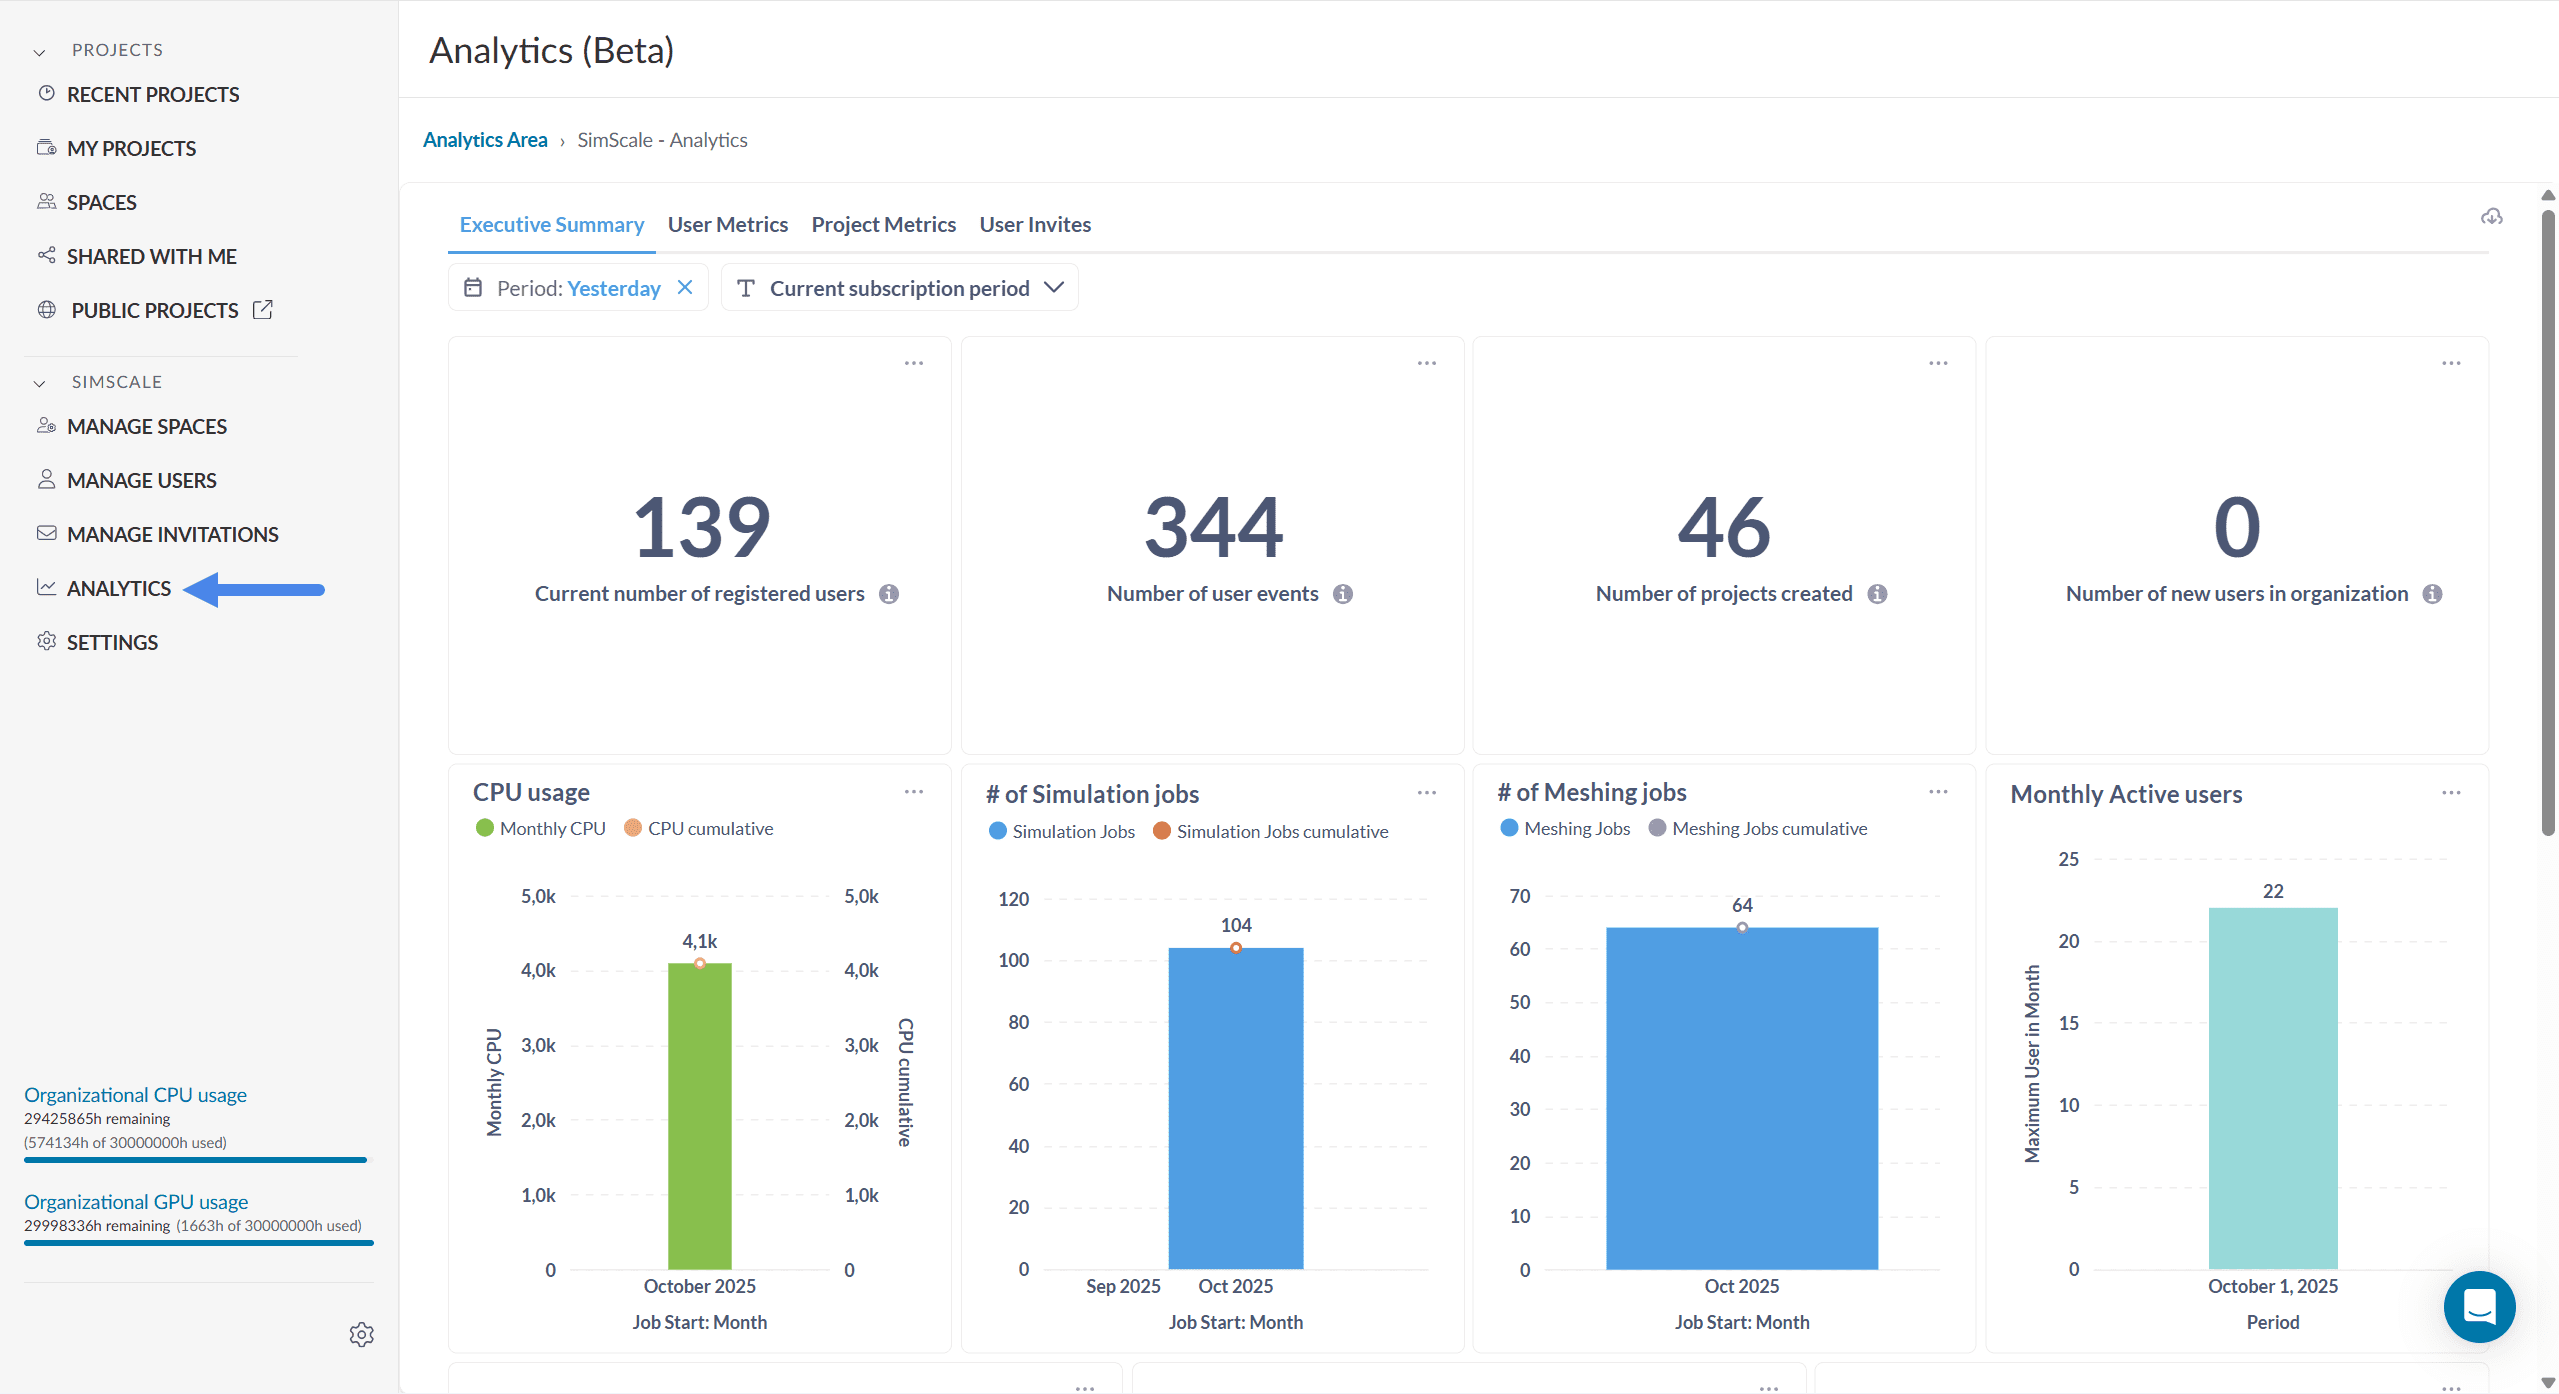
It is possible to check, amongst others:
- Number of users and active users
- Number of jobs and success rates for the whole organization and individual users
- Computing quota usage in total and for each project
- User invites
The data may also be filtered by a certain period of interest.
Important
The analytics tab contains activity and jobs data from June 2024 onwards.
Last updated: December 30th, 2025
Did this article solve your issue?
How can we do better?
We appreciate and value your feedback.


