Meshing in SimScale
In order to compute the solution for a given simulation, the simulation domain needs to be discretized. It essentially means splitting up one large problem into multiple smaller mathematical problems. Solving the entire continuous domain at once is not possible or reasonable whereas solving multiple subdomains of it becomes feasible.
This discretization process is the base for methods such as the Finite Difference Method (FDM), Finite Volume Method (FVM), and Finite Element Method (FEM), whose purpose is to take equations in the continuous form and generate a system of algebraic difference equations. This process generates a set of discrete points and cells called meshing, which, as a whole, cover the entire simulation domain.
In case you want to read more about the theoretical background of meshing, take a look at our SimWiki section, where we describe in more detail what a mesh is.
Mesh Setup
Unlike traditional simulation software where meshing is the second step in the simulation setup after geometry upload, SimScale delays the meshing step until all other steps are completed. This is so that you don’t have to worry or wait until the mesh generation process to assign the setup parameters or boundary conditions, as it can be done on the CAD model itself.
General Mesh Settings
SimScale strives to make the meshing process as simple and user-friendly as possible. In the end, the user should only have to decide on the trade-off between the fineness of the mesh (and thereby the accuracy of the result) and the required computation time (number of processors assigned).
Several algorithms are available to create three-dimensional tetrahedral and hexahedral meshes within the platform. Due to the robustness and general applicability of the meshing algorithms, both automated and manual versions are provided.
Based on the chosen analysis type, a default mesh setup will be created, which in most cases is a good starting point.
Meshing Algorithm
Most of the mesh settings depend on the chosen mesh algorithm. Current meshing strategies available on the platform are:
The available meshing algorithms depend on the chosen analysis type, but also on the CAD domain file format. For example, structural simulations are limited to tetrahedral elements (Standard mesher), while most CFD cases can be solved with any of the given algorithms.
Preferred Number of CPUs (Processors)
The setting for the preferred number of processors defines the size of the cloud computing instance that will be used to compute the mesh. The chosen setting defines the number of computing cores (CPUs) of the machine. In some cases, based on availability, a machine with a different number of cores may be selected to run the job.
When selecting the preferred number of cores, keep in mind that instances with more CPUs also come with more memory, which in many cases is the limiting factor in meshing. If unsure stick to the default Automatic option.
Learn more about the usage of core hours in our knowledge base article.
Mesh Estimation
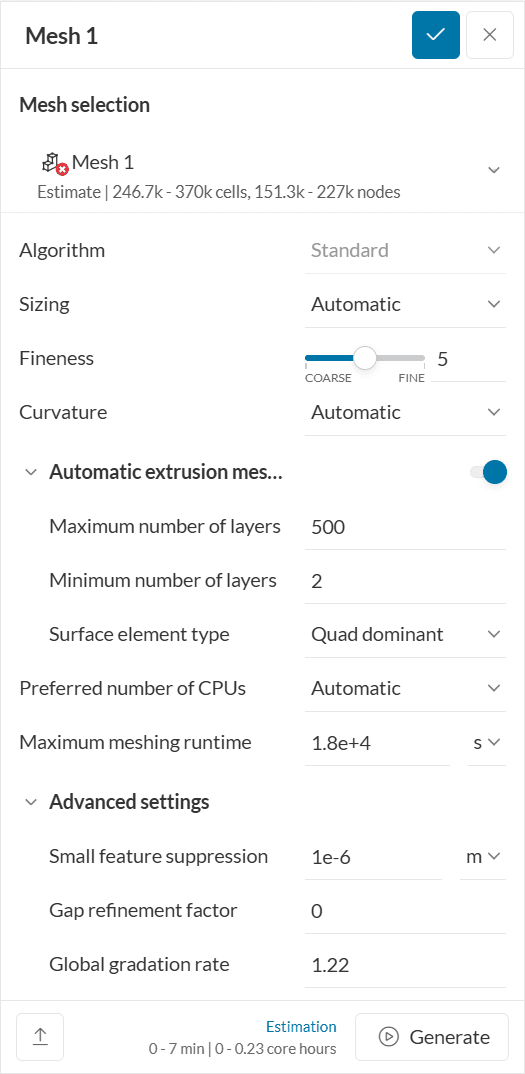
Even before the mesh is generated, the Workbench makes it possible to get an estimated range of the number of cells and nodes that will be created along with the approximate time required and the consumption of core hours. These numbers can be seen at the top and bottom of the mesh settings panel (see Figure 2).
Mesh Generation
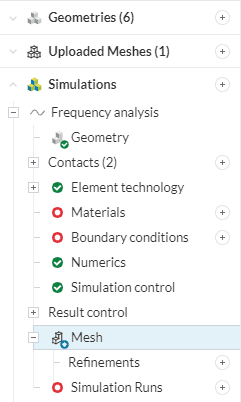
Once all the parameters have been set additional mesh refinements can be added based on individual requirements under Refinements (see Figure 1). Click on the ‘Generate’ button to generate the mesh.
Mesh Assignment
Multiple meshes can be created for the same simulation or the same mesh can be shared across multiple simulations in the project, given that the mesh type is compatible with the chosen analysis type. E.g., a standard mesh that has been created in a Static analysis can also be assigned to a Heat transfer analysis in the same project. Making changes to the mesh in one simulation will also update it in all other simulations wherever it is assigned.
To create a new mesh for the same simulation click on ‘+’ next to Create new mesh or just copy the default settings from previous meshes by selecting Copy mesh settings from… option.

Before a simulation run can be started, the assigned mesh needs to be generated. This can be done manually by clicking on the ‘Generate’ button or automatically when the simulation run is started.
Note
While meshes are created within a simulation, all meshes, independent of where they were first created, can be referenced in, assigned to, and edited from any other simulation setup. Copying a simulation does not also copy meshes, but simply references the original mesh as an independent object.
Mesh Quality
Now it is also possible to check the mesh quality visually on the SimScale platform. This facility is not available for uploaded meshes though. Once the mesh is successfully created, it is indicated with the Complete state symbol ![]() . The mesh log information and quality can be viewed by clicking on the boxed options shown below:
. The mesh log information and quality can be viewed by clicking on the boxed options shown below:
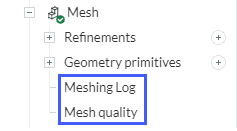
Basic mesh information like the number of edges, faces, nodes, prisms, etc. can be checked under the Event log (see Figure 3).
Want to check and improve your mesh quality with this feature? Quickly check out our mesh quality page or dedicated article with an example using meshing log.
Mesh Upload
Besides creating mesh within the platform, users have the facility to use meshes created with other tools, e.g. Salome, by uploading them directly to the platform. Find out more about mesh upload here.
Try your hand at these meshing algorithms by practicing our mesh tutorials.
Last updated: July 14th, 2025
Did this article solve your issue?
How can we do better?
We appreciate and value your feedback.
What's Next
Meshing in SimScalepart of: Meshing in SimScale


