This article describes how to control and analyze \(y+\) values in SimScale. If you want to know what \(y+\) is, have a look at this forum article. The article describes the law of wall and subsequently how to chose between full resolution and wall function.
Approach
\(y+\) is the dimensionless wall distance that is helpful in determining the thickness of the first cell away from the wall boundary for the given flow parameters. Equation (1) from the forum article above states:
$$ y+ = y \frac{u_t}{\nu} $$
where,
- \(u_t\) is the friction velocity
- \(y\) is the absolute distance from the wall
- \(\nu\) is the kinematic viscosity
Let’s assume we don’t change the fluid properties and the friction velocity. The only remaining variable is the first layer thickness. So let’s see how to change it.
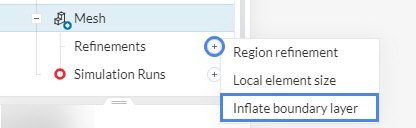
Control y+ During Meshing
You can control the first layer thickness using inflate boundary layers: Mesh >Refinements >Inflate boundary layer.
Depending on the mesh type there are different ways to control the first layer thickness:
Standard Mesher
With the standard mesher, you can inflate boundary layers inside the global mesh settings with Automatic boundary layers toggled on or by adding an inflate boundary layer refinement as shown above
The following settings are available:
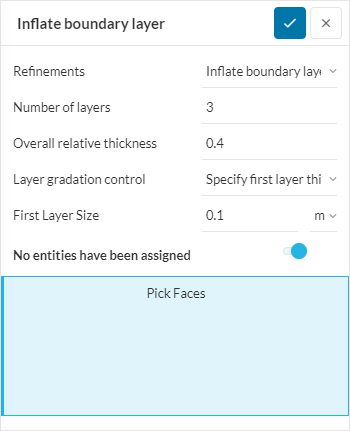
The settings to inflate the boundary layer are both absolute and relative in this case. It allows you to define the number of layers, overall thickness relative to the first local cell size, growth rate between adjacent layers or the absolute thickness of the first layer. Thus you can do basic calculations and add parameters based on the \(y+\) and boundary layer refinement you desire.
Find each term explained under the Inflate Boundary Layer section here.
Hex-Dominant Automatic
With the Hex-Dominant Automatic mesher, the following settings are available:
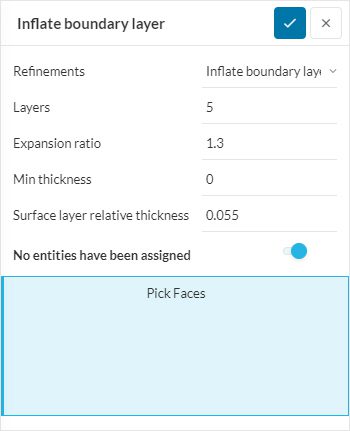
The settings to inflate the boundary layer are relative in this case. The panel allows you to define the number of layers, ratio between each layer, minimum thickness of all layers combined, and the relative first layer thickness with respect to the adjacent layers. Hence, with some simple math, you can enter respective parameters as per the boundary layer refinement required.
Find each term explained under the Layers refinement section here.
Export y+ During the Simulation
The calculation of y+ can be turned on on the SimScale platform by enabling ‘Turbulence‘ in Field calculations under Result control. It will pop a settings panel which will have y<plus> as the default Result type.
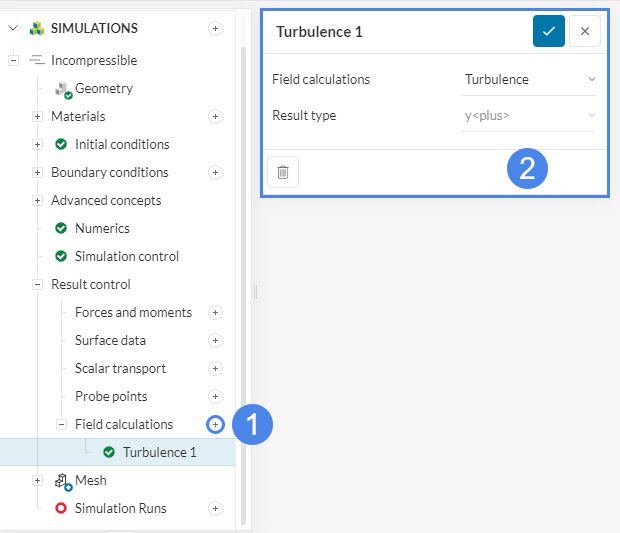
Once your calculation has begun, you can see the option field calculations in the run.
Check the y+ Locally in the Post-Processor
In the online post-processor add a new filter and create Iso volume:
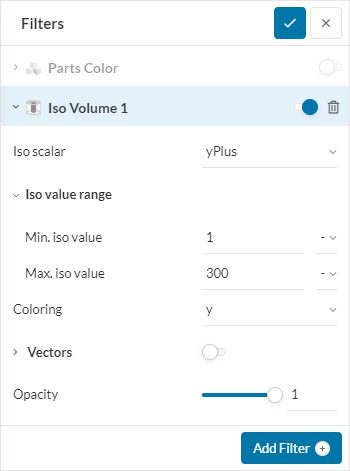
In the settings panel select ‘yPlus’ as the Iso scalar. Now you can change the values of interest by adjusting an Iso volume range where, for e.g., your \(y+\) value is higher than 1.
Note
If none of the above suggestions solved your problem, then please post the issue on our forum or contact us.


