@DaleKramer the numbers vary based on source and turbulence model, but I primarily use Wilcox. 2006. Turbulence Modeling for CFD. ISBN 978-1-928729-08-2 and Ferziger and Peric. 2002. Computational Methods for Fluid Dynamics. ISBN 3-540-42074-6.
The majority of turbulence model wall functions rely on the Law of the Wall principle. The Law of the Wall is only valid above a Y+ of 10 (Wilcox) to 30 (Ferziger) depending on the exact equation used. In order to accurately model the viscous shear layer both Wilcox and Ferziger suggest an initial grid point within a Y+ < 1 with around a 1.2 growth factor. If the first point is outside of Y+ < 1 then the viscous effects are underestimated due to having a smaller shear near the wall. If a wall function is utilized within the 1-10/20/30 range then the function is not valid as you are outside the log-linear range of the shear.
The OpenFOAM turbulence models have all implemented a blending routine for the non-linear part of the wall function curve, but most scientific and other groups would not accept this range for reviewed literature. Most current literature I am aware of tries to keep the Y+ at the wall less than about 0.5 given the computing power that is available.
I am not able access those documents but they would likely be hard for me to understand anyway
I have found one tutorial video question that led me to believe that when using Wall functions, and if we have cells in the Y+ less than 30 range, they simply result in more cells than needed and they will not affect the Wall function results. I believe I also had other guidance that surface cells at Y+<30, when using wall functions, do not lessen the quality of the results.
Are you saying that if using Wall functions, the surface cells that are Y+<50 (or as SimScale recommends Y+<30) contribute to incorrect results or would you say they simply waste computational time for these excess of smaller cells?
As I mentioned in my last paragraph above, the turbulence models used by OpenFOAM (SimScale), as well as many commercial packages (FLUENT, StarCCM, etc), use a blended wall function in the regime less than some minimum Y+ (call it 30). Reality is, if you don’t turn off the wall functions in OpenFOAM, it automatically disables them below a Y+ of about 10 if I remember correctly. Regardless, all of these intermediate blended wall functions add more estimation to the numerical solution and none of them have shown that they are better than just spending the extra computational power to solve the entire wall function. If you’re already solving down to 15, you might as well just go down to 1.
This Wikipedia article does a good job of explaining the Law of the Wall and it has a nice picture so you can get an idea where the functions break down. Law of the wall - Wikipedia
Here are a few great links to information about boundary layers and how to properly resolve them in CFD analysis. I would highly recommend reading these as they are very easy to follow.
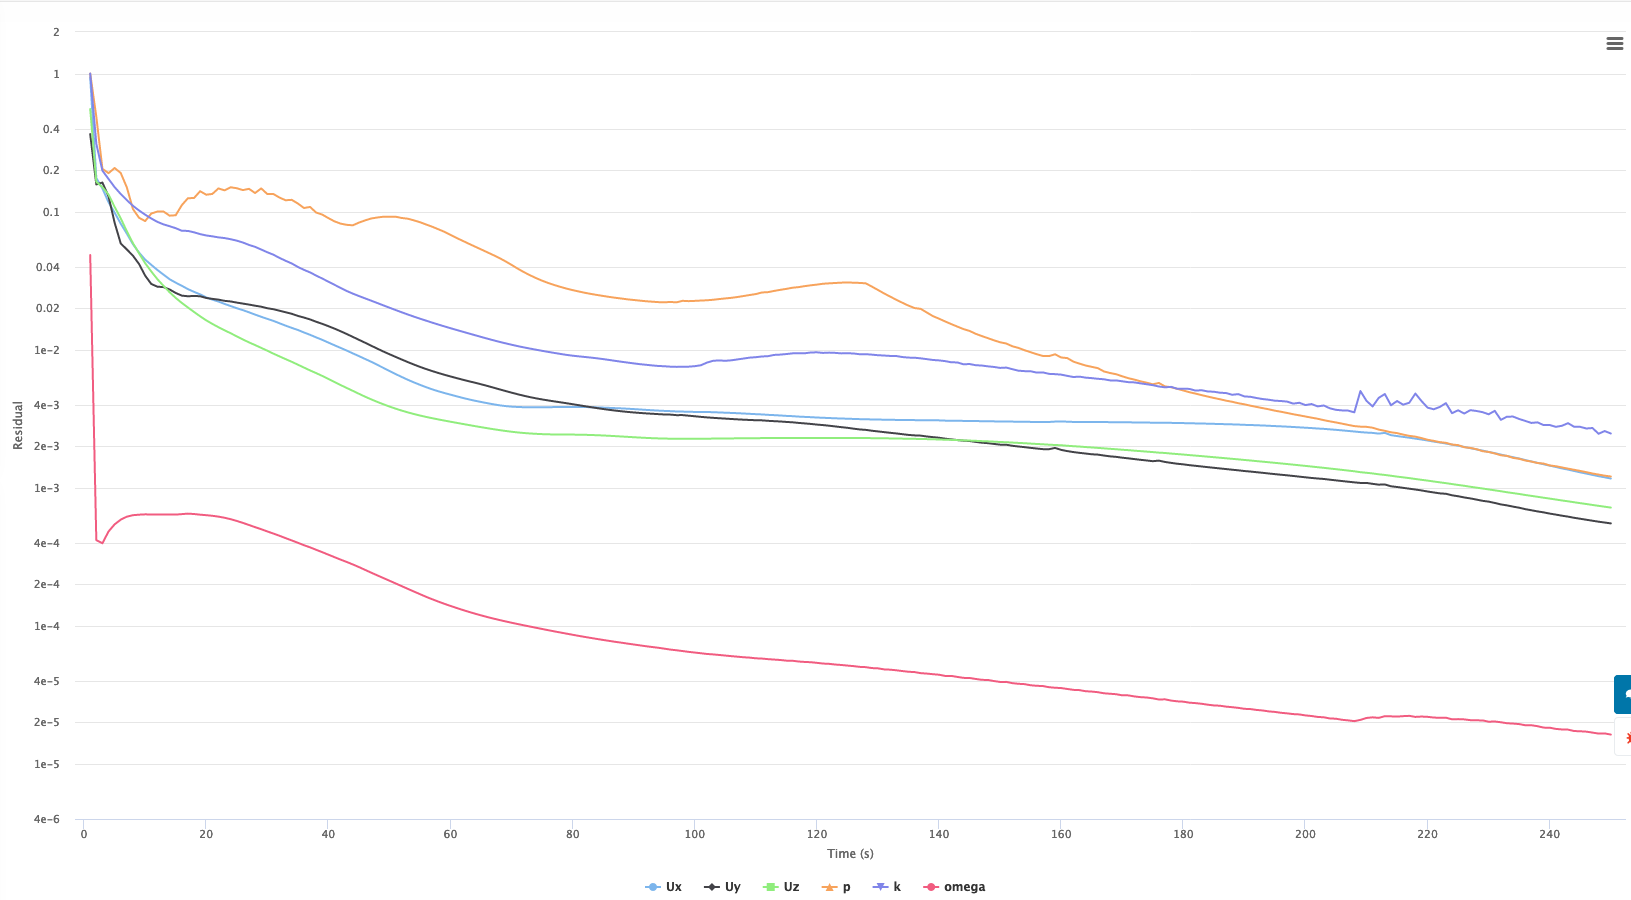
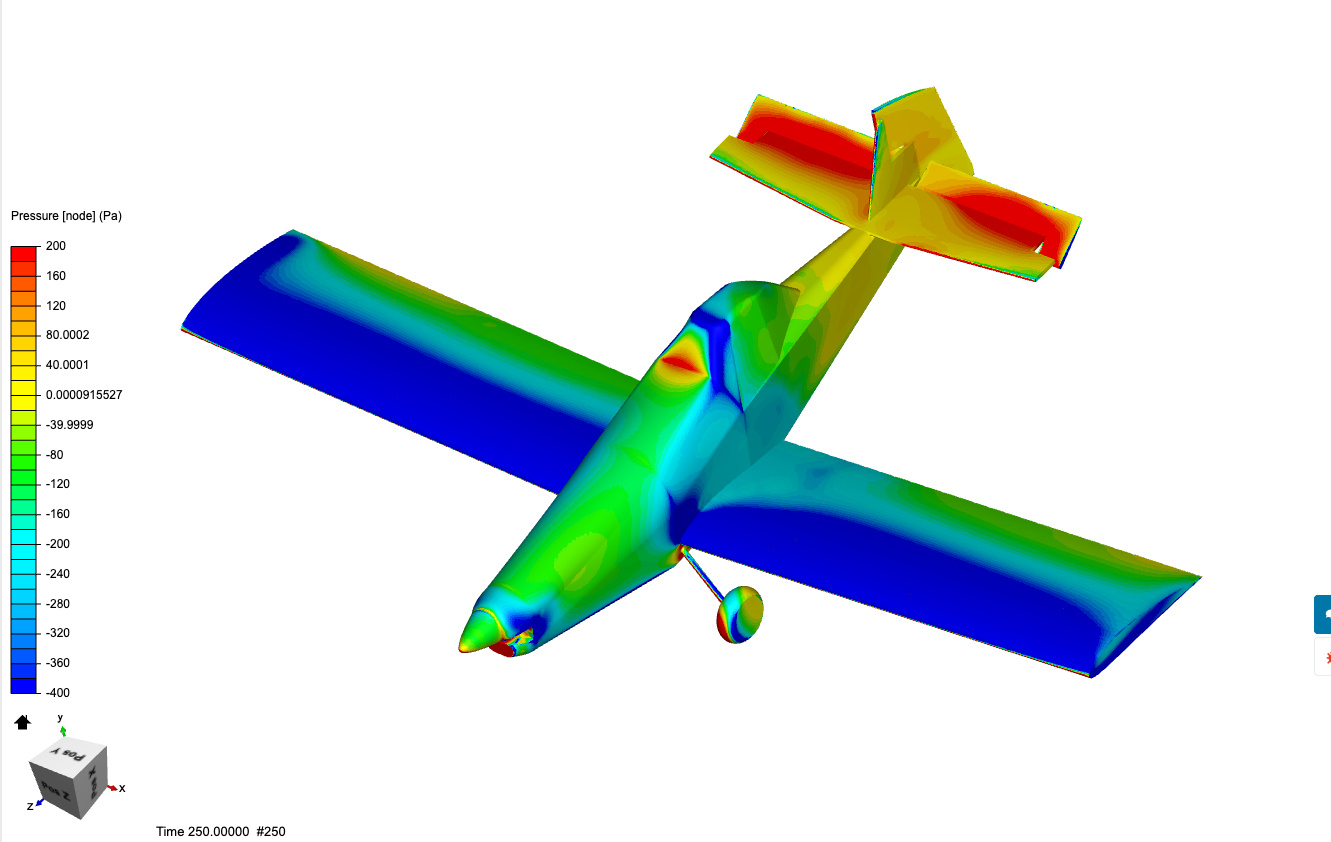
Quick update @DaleKramer: adding the region refinement w/level 4 that you recommended approximately doubled my cell count to 12.1MM! It also seems to have had an effect on convergence. I’m currently doubling the simulation time (250s to 500s) to see if I hit steady state like before, but it’s probably worth a couple pics here. Note, refer to prior post for comparison.
Having a more detailed flow field outside the BL does have my large separation zone reappearing on the lee side of the fuselage.
Convergence:
It will take a few days to absorb this but I can already tell that after first read, I have to rethink what I thought I new about making sure to have the low end of the Y+ mapping in the log-law region/law of the wall region when using wall functions.
Also, I really need to understand about using ‘Eddy viscosity ratio’ mapping to make sure that the prism layers fully encompass the boundary layer.
Also, of great interest is that when there is separated flow expected (as in the case of this topics simulation), wall functions are not applicable and perhaps this whole project should be switched to Full resolution Y+ range.
@jhartung I hope you too are investigating this great help that Bryce is providing…
Yes, I gathered that in a quick scan of those links, we may need full resolution Y+. Quick re-do of the calculator says that I’ll need surface refinement of 12 and 12 layers to get 0.41 ratio. Re-running now but it will probably be a few hours. I’ll post the comparison.
I am not sure you should worry about the extra convergence time, it is in the same range as what I have seen on the larger meshes.
You are getting a larger separation zone with those finer region cells added but it looks to me like they still show significantly less rudder effectiveness than your first uglier mesh. Have you thought of trying to make a Forces and moments results for the fin and rudder surfaces as that seems to be what you are most interested in (this will give you a bit of quantitative results to compare as you proceed)?
I think that, in your shoes I would try to convert this to a Full resolution wall analysis and try to get a Y+ range that is in the viscous/laminar sublayer if I understand the links Bryce has provided since you are looking at separated flow. (I could be wrong on that, I will continue trying to understand Bryces links over the next few days)…
@DaleKramer, the convergence seems to go along with hitting steady-state values in the forces/moments diagrams that I am also doing and not posting. Also when I step back a few frames (50s), I see significant changes in pressure distributions, hence my interest in extending the simulation time.
I’m currently converting to Y+<1 analysis re: Bryce’s recommendations. It makes sense that more detailed modeling is required when separation is the thing we’re trying to capture. Thanks to @jousefm and you for the temporary upgrade as there is no possible way I would be able to run this on 16 cores. Also so freaking cool that this is even possible, thanks to SimScale! Can you imagine just saying “nah, let’s just go ahead and model the entire boundary layer” if you were on your laptop?
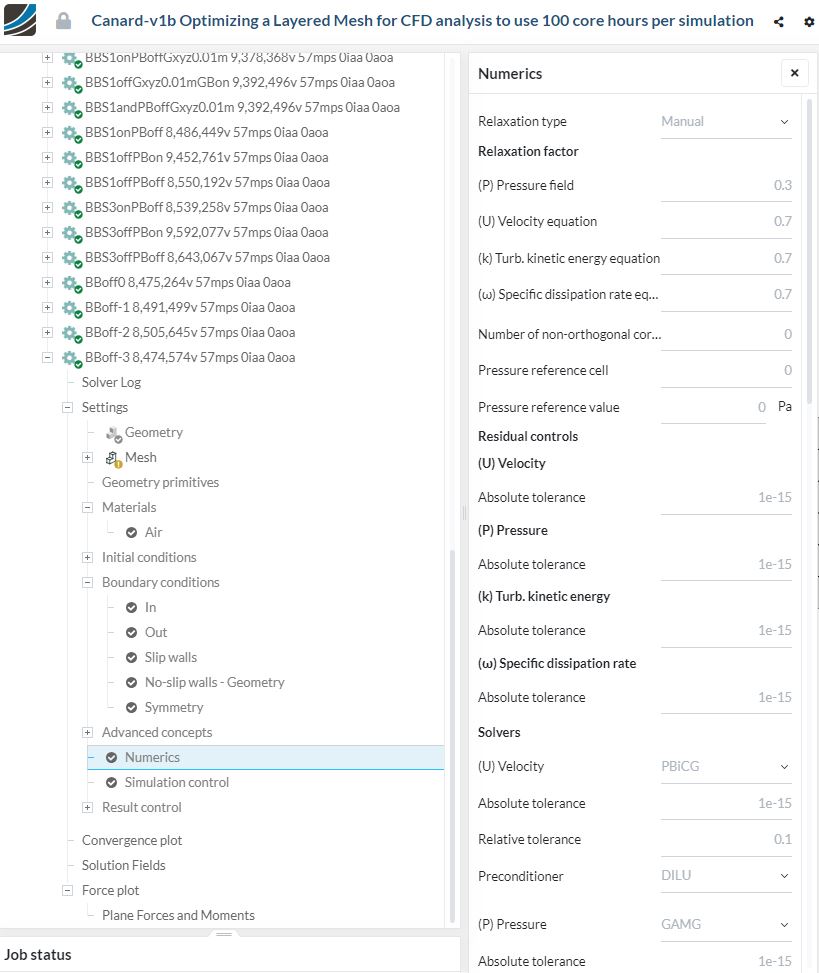
It may be time to discuss the numerical parameters that you use.
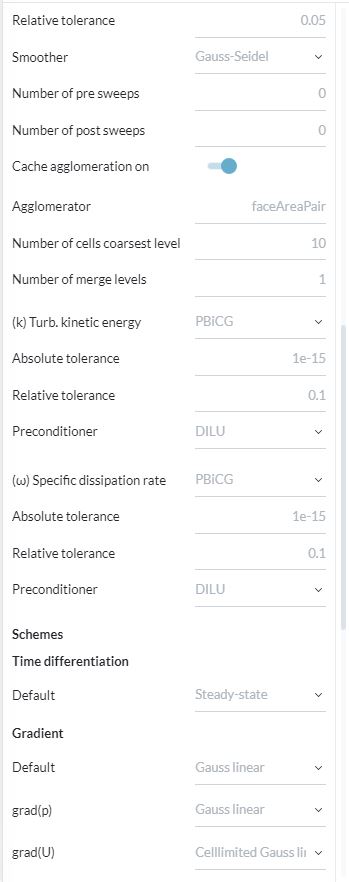
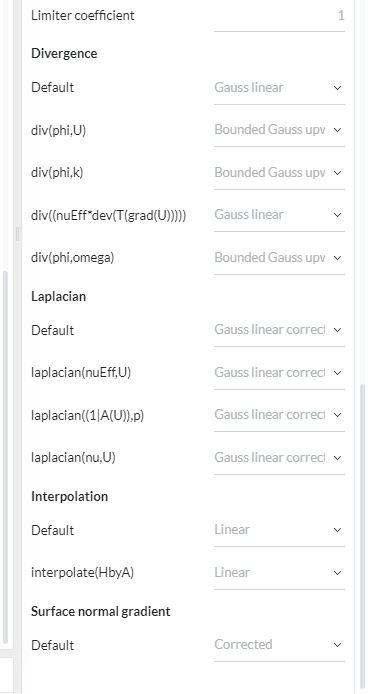
Dylan has shown me to use these parameter values and they have significantly helped me with some issues I had and I use them all the time for my aircraft sims:
Just some of my input here. Great discussion and sharing by the way.
With regards to the relative layer sizing, as recommended in the y+ setup that Jousef & I have written (posted a couple of times), relative layer sizing should be off if you want to really control the layers. That way your size will be absolute and as @LWhitson2 has correctly pointed out, this will stop the layers from changing based on the localized mesh where the layers are applied to. As you all should be aware, Snappy is quite inconsistent when it comes to mesh generation even with the exact same parameters and geometry, which leads to the layers being “unknowable” if relative layer sizing is on. For very corase meshes, relative layer sizing is fine as you can get rough results out.
LWhitson2 has also correctly and brilliant pointed out why we need to ensure that the layers should be strictly between 30 and 300. Less will give inaccurate results and more, the same. However, should one need to use values of y+ less than 30, then full resolution is recommended. Usage of y+ less than 30 is usually dependent on the turb model. For my use cases, k-w SST, a full res run requires a mesh of y+ less than 1.
Usage of the wall functions can give you expected flow structures like separation and vortices I believe. It is only the values of these features that may be inaccurate. Another reason is the turbulence model. From my previous work in flow within an urban environment, the commonly used k-eps cannot adequately produce the expected flow structures, k-w sst can even with wall functions applied.
While that is great, I do think that being able to run a 4-5 meshes at the same time is even more incredible!
Absolute tolerance 1e-15? That seems way overkill. Any simulation of moderate complexity will never reach that level of convergence. Most sources I’ve read cited 1e-6 as ideal convergence, so to save yourself some core hours, I recommend that setting. If you’re having trouble converging, other parameters like the the relaxation factors or the gradient schemes can be adjusted on a case by case basis.
The math is interesting. I’ve been looking through them on and off. If I get a grasp on them I will be sure to share with all of you!
Convergence should be checked graphically in two ways, the residual plots and the force plots. As mentioned, for residuals, 1E-6 is ideal, but if you get 1E-5 or even 1E-4 I would say, it is good enough. Force plots wise, a steady-state or oscillatory steady state is sufficient.
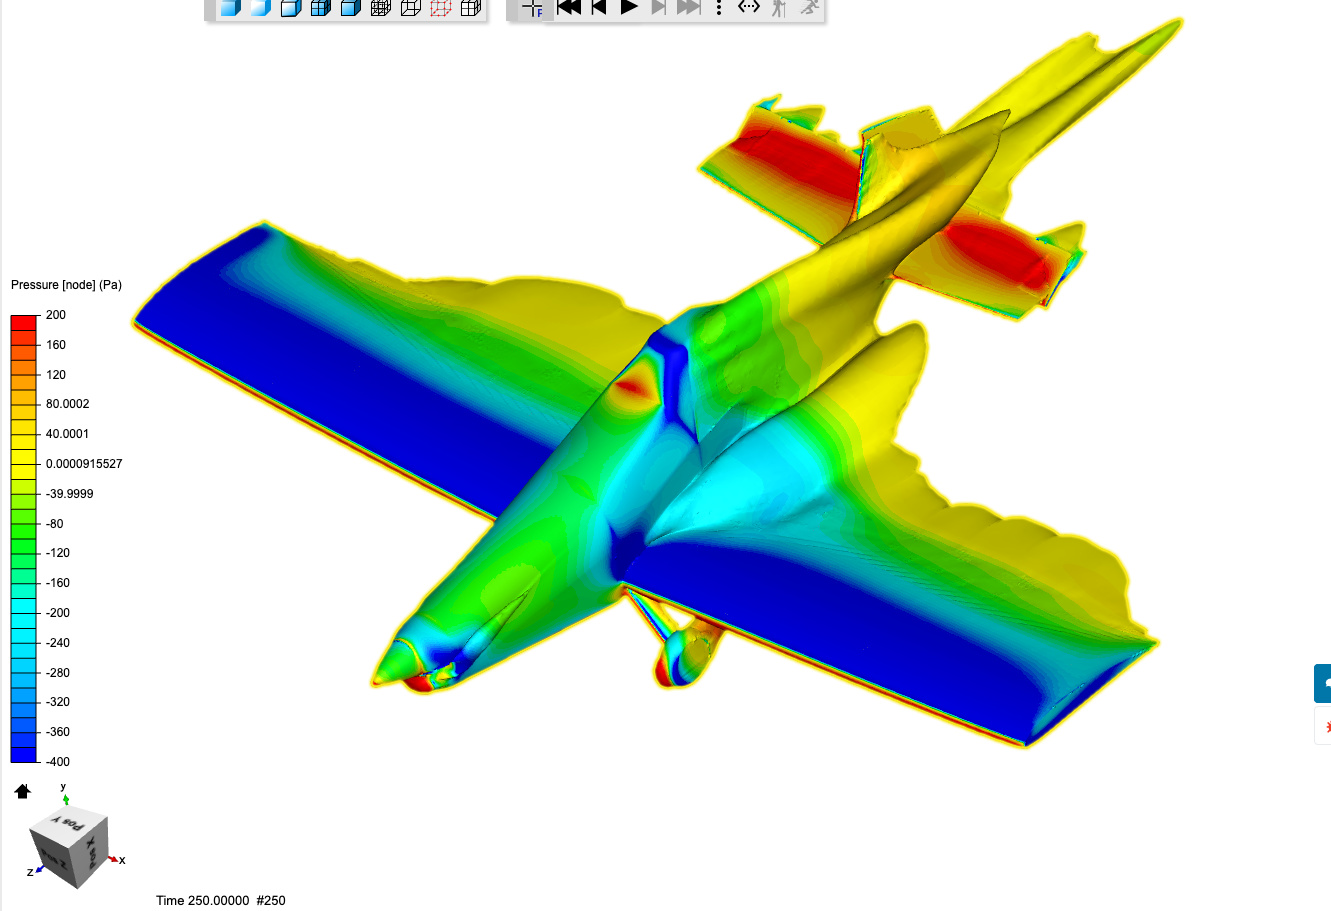
Another visual check is the data contours in the post-processor. Example, if you see pockets of pressure abnormalities then you likely need a longer convergence time or your numerical parameters need to be adjusted.
My point is that I believe that as long as the desired Y+ range is maintained, I end up with a higher percentage of surface cells that get layered when I use ‘Relative layering’ and this higher percentage of layered surface cells would intuitively seem to me to provide more accurate results.
The reason for this is to make sure the simulation does not end early due to an arbitrary residual value being reached. I watch my simulations as they proceed and stop them manually when the forces and moments are considered stable for a few hundred iterations. I have found that there is not necessarily a direct relationship with stable results and residuals. I find this is needed when you are trying to obtain maximum results accuracy after you have validated your setup and which actually does not waste core hours if monitored manually (this was before the days of being able to continue a simulation run . I have saved more core hours by watching results convergence and not having to worry about residuals stopping my run which would then require me to start a whole new run.
Those numerics were suggested by @Dylan who has been able to validate his vehicle CFD setups to AMAZING accuracies as you can see at the end of this post.
This is very interesting and it would then seem to me that OpenFOAM simulations using wall functions don’t need to be too concerned that a few surface cells are layered to Y+<10. I am gaining some confidence back in the use of wall functions as long as Y+ range is strictly maintained 30<Y+<300
Also, since it appears that the dividing point of results accuracy of using wall vs full resolution equations is Y+=11, then, again as long as you only have a few surface cells 10<Y+<30 and very few cell where Y+<10, you are still probably going to get good results.
Is that a good concept to commit to memory for OpenFOAM simulations?
@DaleKramer, while OpenFOAM is fairly robust at handling a multitude of Y+ values you should still try to match your Y+ to both the turbulence model you are using and the problem you are solving. SimScale offers the two most widely used turbulence models in OpenFOAM, κ-ε and κ-ω Menter SST.
κ-ε: Generally valid for values of 30<Y+<300; the Realizable κ-ε model is valid for Y+<10 as well but I’m not sure SimScale has implemented that one. The traditional model was designed for internal flows such as pipes, flows that have a positive pressure gradient, and free flows such as a jet into a quiescent fluid. This model will generally not perform well in flows that require accurate determination of separation such as external aerodynamics.
κ-ω SST: This model is designed to perform very well for flows with Y+<1 but can handle a Y+<5~10 depending on the resolution required. This model reverts to the κ-ε formulation in areas of Y+>~50 and in the freestream. This makes it ideal and the preferred method for external aerodynamics and other cases where capturing flow separation is extremely important.
I hope this kind of helps and I’m always willing to expand more on the topic if you are interested.
Thanks, I should have included that for my aircraft sims, I have only used the SimScale κ-ω SST turbulence model due to similar recommendations and research I had done.
Some of the points you mentioned can be found in my y+ SimWiki post: What is y+ (yplus)? - ping me if you have ideas for new posts. Maybe we can work on some together
Well gentlemen, this is all very interesting but unfortunately the Kramer method for mesh breaks down for Y+<1, at least in my case where the layers become very thin. I attempted using absolute layer sizing and saw (as @DaleKramer observed in his original posts) that Snappy subsequently threw out nearly all of the layers after a few iterations. So, I’m back to the beginning again
Totally… I scoured the log and attempted to lower some of the quality checks. I also started looking at OpenFOAM tutorials, documentation, and forums. We are not the only folks frustrated with this. None of the parameters looked to me like they would cause complete rejection of all layers - not even one cell was retained.
Re: your method “breaks down”, it’s simply that it requires really high surface refinement which exceeds the machine memory.