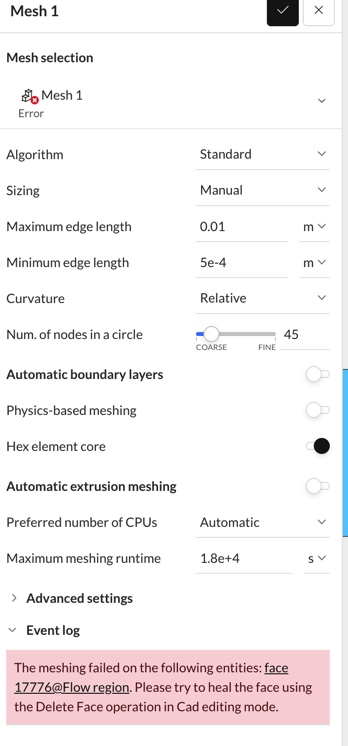
Mesh failing

Hi, we are designing a stem racing car however our mesh has started failing for our recent designs.

Hi @abengani,

Welcome to the community!

The good news is that your meshing settings actually look fine for a baseline run. The issue here isn’t your mesh sizing; it is a specific defect in your CAD geometry.

If you look closely at the Event Log at the very bottom of your screenshot, the SimScale solver actually caught the exact culprit: face 17776@Flow region.

Why this is happening: This almost always occurs when a CAD model is imported with a “sliver face” (a microscopic, almost invisible broken polygon), an unstitched edge, or a self-intersecting surface. When the mesher attempts to build cells down to your 0.5 mm (5e-4 m) minimum edge length around that physically impossible surface, the math fails, and the entire meshing process crashes.

How to fix it immediately: SimScale actually provides the solution right in the error box! Here is how to execute it:

  1. Go back to your workbench and open the CAD Edit Mode (the small pencil icon next to your geometry).

  2. Look for the Delete Face tool in the operations menu.

  3. Select face 17776 (you can often search for it or click it if it highlights).

  4. Apply the operation. The CAD mode will attempt to delete that broken face and mathematically “heal” or patch the gap it leaves behind.

A quick tip for STEM racing cars: Since these cars often have complex aerodynamic curves, CAD software can sometimes generate hundreds of these tiny defective faces during boolean operations (like subtracting the car from your virtual wind tunnel). If you find that fixing one face just leads to the mesher failing on a different face, you might need to go back into your original native CAD software, run a “Geometry Check” or “Heal” tool, and re-export the model as a clean STEP or Parasolid file.

Hi, I tried to do another simulation however a similar issue appeared where the mesh failed on an edge instead of a face.

Hi @abengani,

You are making progress! Moving from a face failure to an edge failure means you are clearing out the geometry bugs, but the mesher just tripped over a new one.

Why this is happening: Your minimum edge length is set to 5e-4 m (0.5 mm). If edge 9526 in your CAD model is a microscopic line segment shorter than 0.5 mm, or if it forms an impossibly sharp sliver between two larger surfaces, the meshing algorithm cannot mathematically build cells around it and crashes.

Here is exactly how to track down that specific edge and fix it:

1. Find the exact coordinates As the red error box mentions, the exact location of the failure is recorded. Open your Meshing Log (the text icon next to the error box) and scroll all the way to the bottom. It will give you the precise X, Y, and Z coordinates of the crash.

2. Locate the defect on your car Go back into CAD Edit Mode. You can often type edge 9526 into the search bar at the top to highlight it. If it doesn’t highlight, use the XYZ coordinates from the log to zoom into that exact location on your car. It is usually hiding in a complex area like the wing roots or wheel axles.

3. The Fix Edge defects are sometimes a bit trickier to fix directly in SimScale compared to face defects.

  • Quick try: You can try using the Delete Face tool on the faces immediately attached to that edge to see if SimScale can heal the whole intersection.

  • The foolproof fix: If SimScale cannot heal it, go back into your native CAD software where you designed the car. Zoom into that specific spot, remove any microscopic fillets, merge split lines, or stitch the gap, and re-export your clean STEP file.