Hello everyone, good afternoon,
I’m working on a personal hobby project, which is about an invented car, containing MRF zones and radiators.
I’m trying to simulate the aerodynamics around the car and calculate de Downforce and Drag generated.
My objective is to achieve a y+ → 100 having a Freestrem velocity of 45 m/s and using the air material from Simscale’s library.
I’ve generated the mesh and I’d like to download the mesh to process it and check it on paraview because for me it is much easier and comfortable. The problem is that this was the way I used to study my meshes, but now I’m not able to download the mesh, has anything in the Simscale wizards changed? Could someone explain to me how to download it now?
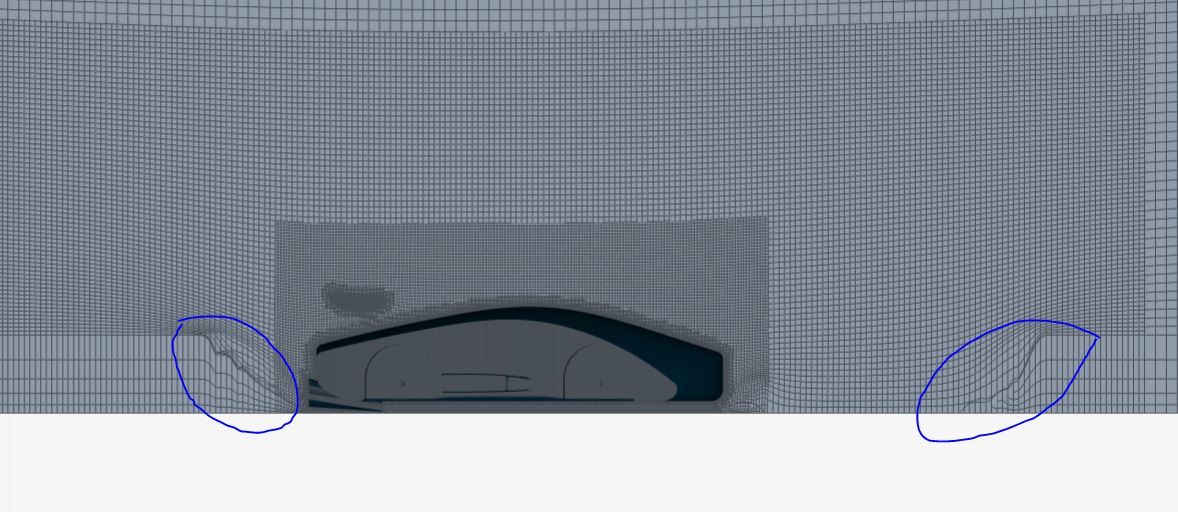
Apart from that, I also would appreciate if anyone could give me some tips of how to improve my mesh in the marked regions (front and rear zones of the car, and under the diffuser), is this happening because of the inflation layer from the Zmin axis is too thick?
The project link is:
CFD_Design_Invented_CAR by jaimegm16 | SimScale
Thanks for your time!
Best regards,
Jaime Guerero
@dschroeder, something for you and maybe want to comment on? 
P.S.: Do not rely too much on the “mesh downloading” functionality which is still available up to a certain extend. You can theoretically run 1 time step, stop the simulation and then get the data. However this will be phased out soon, just for your interest.
Cheers!
Jousef
Hi Jousef,
Thanks for you reply. So, how would you recommend me to check my mesh before running a simulation? Or when this options gets phased out?
Best regards,
Jaime
Hi Jaime,
No specific date yet but soon  Regarding the mesh: the log can help to see if there are some erroneous elements inside of your mesh. But apart from that you also need to do some sanity checks and see if the flow behaviour is actually correct/makes sense and if the y+ value is in the expected range.
Best,
Jousef
Jamie
So far i see two things that could be causing your problems.
- Since you are using absolute layering the bounding box layer addition Final Thickness should be relatively small. A good estimate is less then the area you have under the car. This is currently set to 0.2m which is double the space you have.
This is under the car
In the first picture, it seems you have boundary layer addition cells then they go away closer to the car, Probably because they are failing and cannot be added.
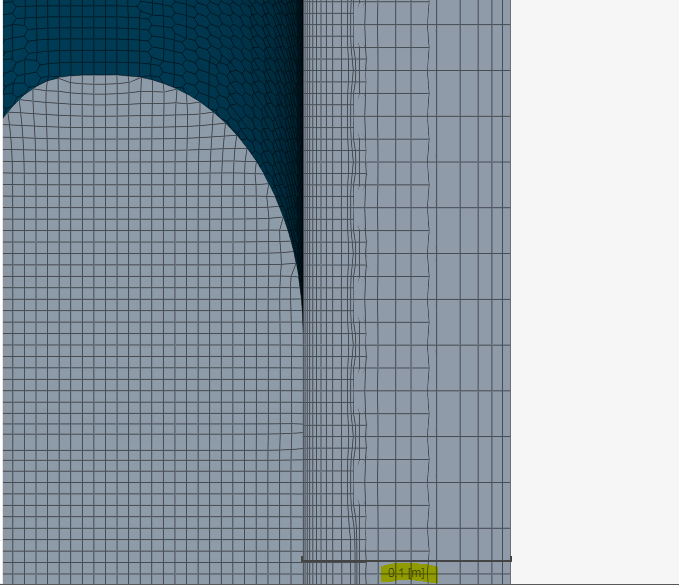
- In the second pic you have an 8 cell boundary layer on the diffuser next to the 8 cell BL on the car, also near the 5 cell bounding box layers. This is most likely too many layers and is not really necessary, with how the k-omega SST uses wall functions, and especially for your Y+ goals.
I would highly recommend running only 2-4 layers for your boundary layer and bounding box layers, then run a simulation after meshing and check Your Y+ values using the program created by Dale Kramer here
Good luck!
Dan
Hi,
Thank you for your time answering my question.
I’ll try yo fix the problem wiht your suggestions and reduce the BL as well.
Once I’ve my mesh finished I’ll let you know
Best regards,
Jaime
Has this been phased out? I’d like to download a mesh so that I can convert it into a 1-cell thick 2D mesh. This is for use with the wedge boundary condition, as described in Wedge BC meshing issue - Help Please - #5 by jousefm